Video
, in the sense of electronic signals representing moving pictures, has been around since about the 1930s.
Today, it is easy to think of videos
as something created, manipulated, stored,
and used entirely in the context of digital computing devices and the associated data networks,
and to forget just how recent a phenomenon that truly is.
Those first video signals were as emphemeral as the electrical impulses that represent sound on a telephone wire
(although John Logie Baird did make experiments with disc recording).
In the late 1950s, magnetic tape came into use for recording video in studio work. By the end of the 1970s, video tape recorders and video disc players were beginning to appear in homes. People began doing creative things with them, very early on. At the same time, in the production studio, digital video began to appear — initially, in stand–alone devices such as time–base correctors, which digitized at the input, and converted back to analog signals at the output.
Creating and manipulating video inside digital computers goes back to the 1960s work of John Whitney
(who had begun in the 1940s with war–surplus electromechanical analog computers),
but became a reality in professional production environments circa 1990,
for instance with the AViD off–line
video editing system for film–based motion pictures.
Digital video came to the home in the late 1990s, in the form of the DVD, and DV and Digital–8 camcorders.
By this point, the personal computer had become powerful and capable enough for handling the complexity and high data
rates of video generation, editing, and transformation —
although some brilliant hacks had allowed enthusiasts to achieve remarkable results even in the mid–80s.
For a long time, the first requisite to working with video on the computer was to get it into the computer,
and this is the realm of the capture card
, a device which converts the analog video signal into a
digital bitstream, and presents it to the main data bus of the computer in a format that can be stored and processed.
The multimedia PC boom which began in the late 1990s saw a wide variety of analog TV tuner and video–capture solutions marketed, mostly for the PCI and AGP busses which were standard at that period. Households had analog videos and video equipment, and they were buying desktop computers. The picture today is quite different, and the selection of capture cards for the PCIe bus is limited. There are cheap and dubious USB solutions, and there are professional solutions starting in the hundreds of dollars US, and not much in between.
When you find something in the lower price range, there is a good chance it will incorporate the CX23885 analog–video digitizing and processing microcircuit. This chip is considered to be old and well–supported, and a driver for it has been included in the main–line Linux kernel since 4·0. Hauppauge (sometimes with a trailing exclamation mark) has been in the consumer computer video business for a long time, and offers (or offered) a PCIe version of their former PCI–bus product, the ImpactVCB. We install the card in the PCIe slot, and sure enough :
$ lspci
  03:00.0 Multimedia video controller: Conexant Systems, Inc. CX23885 PCI Video and Audio Decoder (rev 04)
$ udevadm info -q all /dev/video0
  P: /devices/pci0000:00/0000:00:1c.4/0000:03:00.0/video4linux/video0
  N: video0
  S: v4l/by-path/pci-0000:03:00.0-video-index0
  E: DEVLINKS=/dev/v4l/by-path/pci-0000:03:00.0-video-index0
  E: DEVNAME=/dev/video0
  E: DEVPATH=/devices/pci0000:00/0000:00:1c.4/0000:03:00.0/video4linux/video0
  E: ID_FOR_SEAT=video4linux-pci-0000_03_00_0
  E: ID_PATH=pci-0000:03:00.0
  E: ID_PATH_TAG=pci-0000_03_00_0
  E: ID_V4L_CAPABILITIES=:capture:audio:
  E: ID_V4L_PRODUCT=Hauppauge ImpactVCB-e
  E: ID_V4L_VERSION=2
  E: MAJOR=81
  E: MINOR=0
  E: SUBSYSTEM=video4linux
  E: TAGS=:seat:uaccess:
  E: USEC_INITIALIZED=11093406
$ 4l2-cvtl --all -d /dev/video0
  Driver Info (not using libv4l2):
	Driver name   : cx23885
	Card type     : Hauppauge ImpactVCB-e
	Bus info      : PCIe:0000:03:00.0
	Driver version: 4.15.18
	Capabilities  : 0x85220011
		Video Capture
		VBI Capture
		Audio
		Read/Write
		Streaming
		Extended Pix Format
		Device Capabilities
	Device Caps   : 0x05220001
		Video Capture
		Audio
		Read/Write
		Streaming
		Extended Pix Format
  Priority: 2
  Video input : 1 (S-Video: ok)
  Audio input : 0 (Baseband L/R 1)
  Video Standard = 0x00001000
	NTSC-M
  Format Video Capture:
	Width/Height      : 720/480
	Pixel Format      : 'YUYV'
	Field             : Interlaced
	Bytes per Line    : 1440
	Size Image        : 691200
	Colorspace        : SMPTE 170M
	Transfer Function : Default (maps to Rec. 709)
	YCbCr/HSV Encoding: Default (maps to ITU-R 601)
	Quantization      : Default (maps to Limited Range)
	Flags             :
  Crop Capability Video Capture:
	Bounds      : Left 0, Top 0, Width 720, Height 480
	Default     : Left 0, Top 0, Width 720, Height 480
	Pixel Aspect: 11/10
  Streaming Parameters Video Capture:
	Frames per second: 29.970 (30000/1001)
	Read buffers     : 2

  User Controls

                     brightness 0x00980900 (int)    : min=0 max=255 step=1 default=128 value=128 flags=slider
                       contrast 0x00980901 (int)    : min=0 max=127 step=1 default=64 value=64 flags=slider
                     saturation 0x00980902 (int)    : min=0 max=127 step=1 default=64 value=64 flags=slider
                            hue 0x00980903 (int)    : min=-128 max=127 step=1 default=0 value=0 flags=slider
                         volume 0x00980905 (int)    : min=0 max=65535 step=655 default=20992 value=20992 flags=slider
                        balance 0x00980906 (int)    : min=0 max=65535 step=655 default=32768 value=32768 flags=slider
                           bass 0x00980907 (int)    : min=0 max=65535 step=655 default=32768 value=32768 flags=slider
                         treble 0x00980908 (int)    : min=0 max=65535 step=655 default=32768 value=32768 flags=slider
                           mute 0x00980909 (bool)   : default=0 value=0
Note that the video capture pin defaults to 0, “Composite Video”. Because I am running video through a processing chain, I found it preferable to use the S–Video input. To set this, the command is :
v4l2-ctl --set-input=1 -d /dev/video0
You may imagine my surprise when I attempted to actually capture analog NTSC video. (I have not done anything with PAL yet. My only source for it would be a standards converter.) Consider the following command–line :
ffplay -f v4l2 -i /dev/video0 -vf "crop=out_w=704:x=12,scale=640:480"
If you are familiar with the standards for digitization of analog video, you will be aware that both NTSC (525 lines, 480 active lines, 29·97 frames per second, 2:1 interlace) and PAL (625 lines, 576 active lines, 25 frames per second, 2:1 interlace) are sampled at 13·5 MHz, with 720 active samples per line (excluding the horizontal blanking interval). You will also be aware that only 704 of the 720 samples on the NTSC line are used, the remainder being blanked. Some capture devices center the active video, and some do not, so the “x” parameter of the “crop” filter may require tweaking to avoid a thin black bar down one side of the screen and a loss of picture at the other side.
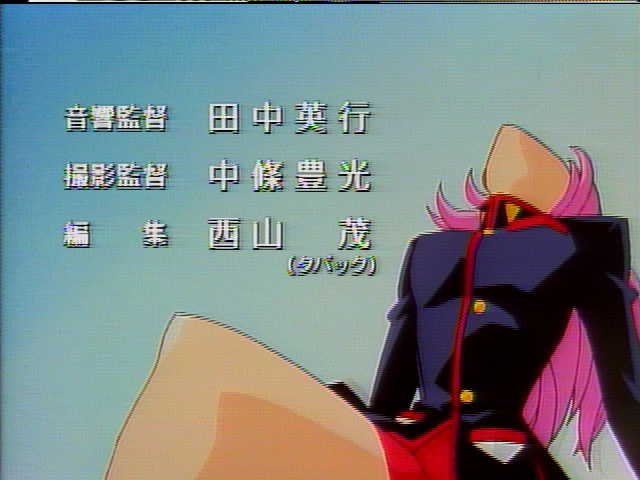
Contrary to all expectation, the result is an unwatchable mess, and any kind of scaling or post–processing only makes it worse.

It is clear that the picture lines are being read in the wrong order.
The card is capturing interlaced video, but for some reason FFmpeg is reading it as progressive video,
and interleaving the two fields incorrectly.
Where the order of lines, reading down the screen, should be ABCD
, it is instead BADC
.
Inspection of the source code
for the CX23885 Linux driver shows that there is logic to read out 525– and 625–line formats
with their field orders reversed per convention, and it is possible that the card is not responding correctly to this.
Given the presence of what appears to be VBI garbage at the top of the screen, it may even be that the capture card
is simply starting its active sampling on the wrong line.
Searching around the Web found a few sporadic mentions of this problem, going back quite a few years, and no solutions. I can only assume that either (a) the problem occurs only rarely ; or (b) people have such low expectations for analog video that they just accept the garbled output. I certainly am not in the latter category.
The obvious solution would be to use the field_order option in ffmpeg-codecs to mark the video as
interlaced and indicate the field order.
In fact, however, although this generates the expected messages, it does not improve the appearance of the image ;
nor does the fieldorder video filter fix things, either by itself,
or in combination with field_order options.
There is also a top option for the rawvideo decoder,
which doesn’t seem to help either.
It seems clear that what we want to do is the swap the positions of the odd and even lines, which is what the
fieldorder filter is meant to do.
For some reason, it isn’t doing that.
But we have other options.
The first is the il filter.
According to the documentation :
Deinterleave or interleave fields.
This filter allows one to process interlaced images fields without deinterlacing them. Deinterleaving splits the input frame into 2 fields (so called half pictures). Odd lines are moved to the top half of the output image, even lines to the bottom half. You can process (filter) them independently and then re–interleave them.
In particular, the ls (for luminance) and cs (for chrominance)
options will interchange the odd and even lines.
This seems ideal.
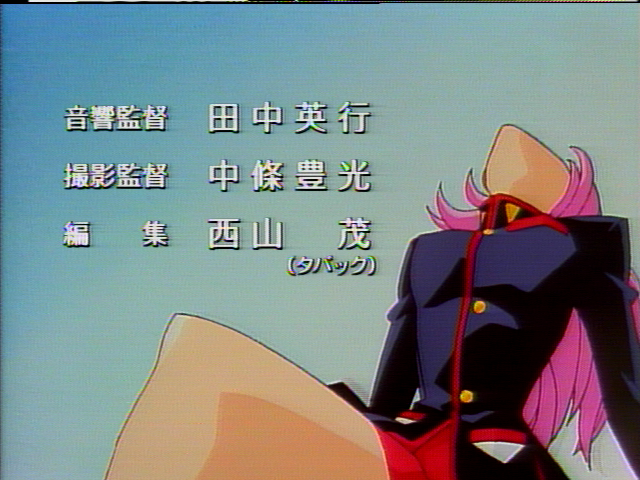
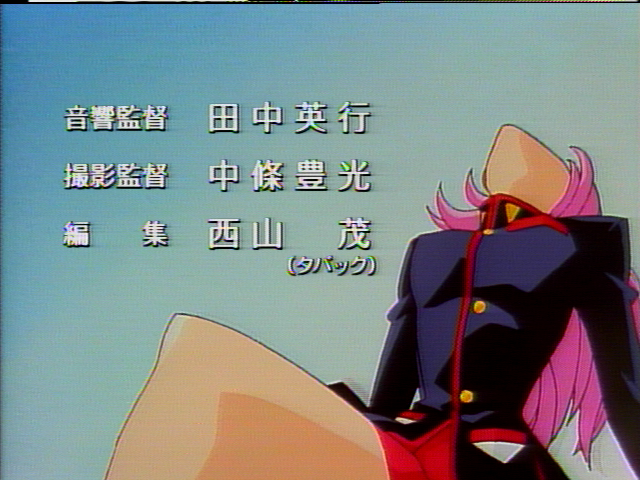
And indeed, the desired image quality is achieved with a minimal CPU load,
although there is still a little junk
at the top of the screen.
(Some versions of FFmpeg have a handy fillborders filter, but this was written using
3·4·11 which does not.)
The resulting frames can then be handled by conventional de–interlacing algorithms without trouble.
$ ffplay -f v4l2 -i /dev/video0 -vf "il=ls=1:cs=1,crop=out_w=704:x=12,scale=640:480"

Curiosity, however, leads us to consider other approaches, of which there appear to be at least two.
The first is to use the weave filter.
Ideally, we would set the video output from the capture card to Sequential Top-Bottom,
but FFmpeg (for reasons unclear) seems to re–set the v4l2–ctl Field
option when it opens the capture device.
Further investigation may find a way to use this for good.
The following three commands all give the same (correct) output for me.
$ ffplay -f v4l2 -i /dev/video0 -vf "setfield=mode=bff,separatefields,weave,crop=out_w=704:x=12,scale=640:480"
$ ffplay -f v4l2 -i /dev/video0 -vf "separatefields,weave=first_field=t,crop=out_w=704:x=12,scale=640:480"
$ ffplay -f v4l2 -i /dev/video0 -vf "separatefields,weave,crop=out_w=704:x=12,scale=640:480"

And there is yet a third possibility, using a filter intended for processing stereoscopic videos. The following two commands appear to have the same results :
$ ffplay -f v4l2 -i /dev/video0 -vf "stereo3d=in=irl:out=irr,crop=out_w=704:x=12,scale=640:480"
$ ffplay -f v4l2 -i /dev/video0 -vf "stereo3d=in=irr:out=irl,crop=out_w=704:x=12,scale=640:480"

All of this is fine, as long as we can do everything we want within FFmpeg. But what if we want to use other tools, such as VLC or OBS? We can’t just stick an FFmpeg command line in front of those other programs — or can we?
Enter the v4l2loopback kernel module.
This module may be standard on your Linux kernel, or you may have to insert it.
What it will do is create another video device, which will probably be enumerated as /dev/video1
if the PCIe capture card is /dev/video0.
This device, however, is a dummy, which you can feed from elsewhere.
$ sudo modprobe v4l2loopback
$ ffmpeg -f v4l2 -i /dev/video0 -vf "il=ls=1:cs=1,crop=out_w=704:x=12,scale=640:480" -f v4l2 /dev/video1
Now you can read the corrected video from whatever application you want to use.
Recently, Hauppauge has begun selling what is marketed as a new revision of the ImpactVCB–e card.
This Model 180100
, however, while it overall looks the same, is a completely different
device and does not behave the same way.
It actually contains a USB host controller and an Auvitek AU8522 webcam chipset.
Thus it requires entirely different drivers, and behaves differently, from the classic
ImpactVCB–e.
It does not seem to have the line re–ordering problem,
but that doesn’t mean it is free from other troubles which I haven’t documented.
Occasionally, attempting to open the capture device from an application such as VLC or OBS will cause it to lock up and stop responding. I have found the following sequence of commands useful :
$ echo "1" | sudo tee /sys/bus/pci/devices/0000:03:00.0/remove
$ echo "1" | sudo tee /sys/bus/pci/rescan
$ v4l2-ctl --set-input=1 -d /dev/video0
Note that the position of your card on the PCIe bus may be different, but can readily be found using $ lspci.
If you want to make that into a script, it would be wise to put some such instruction as
$ sleep 3 between the first two commands.