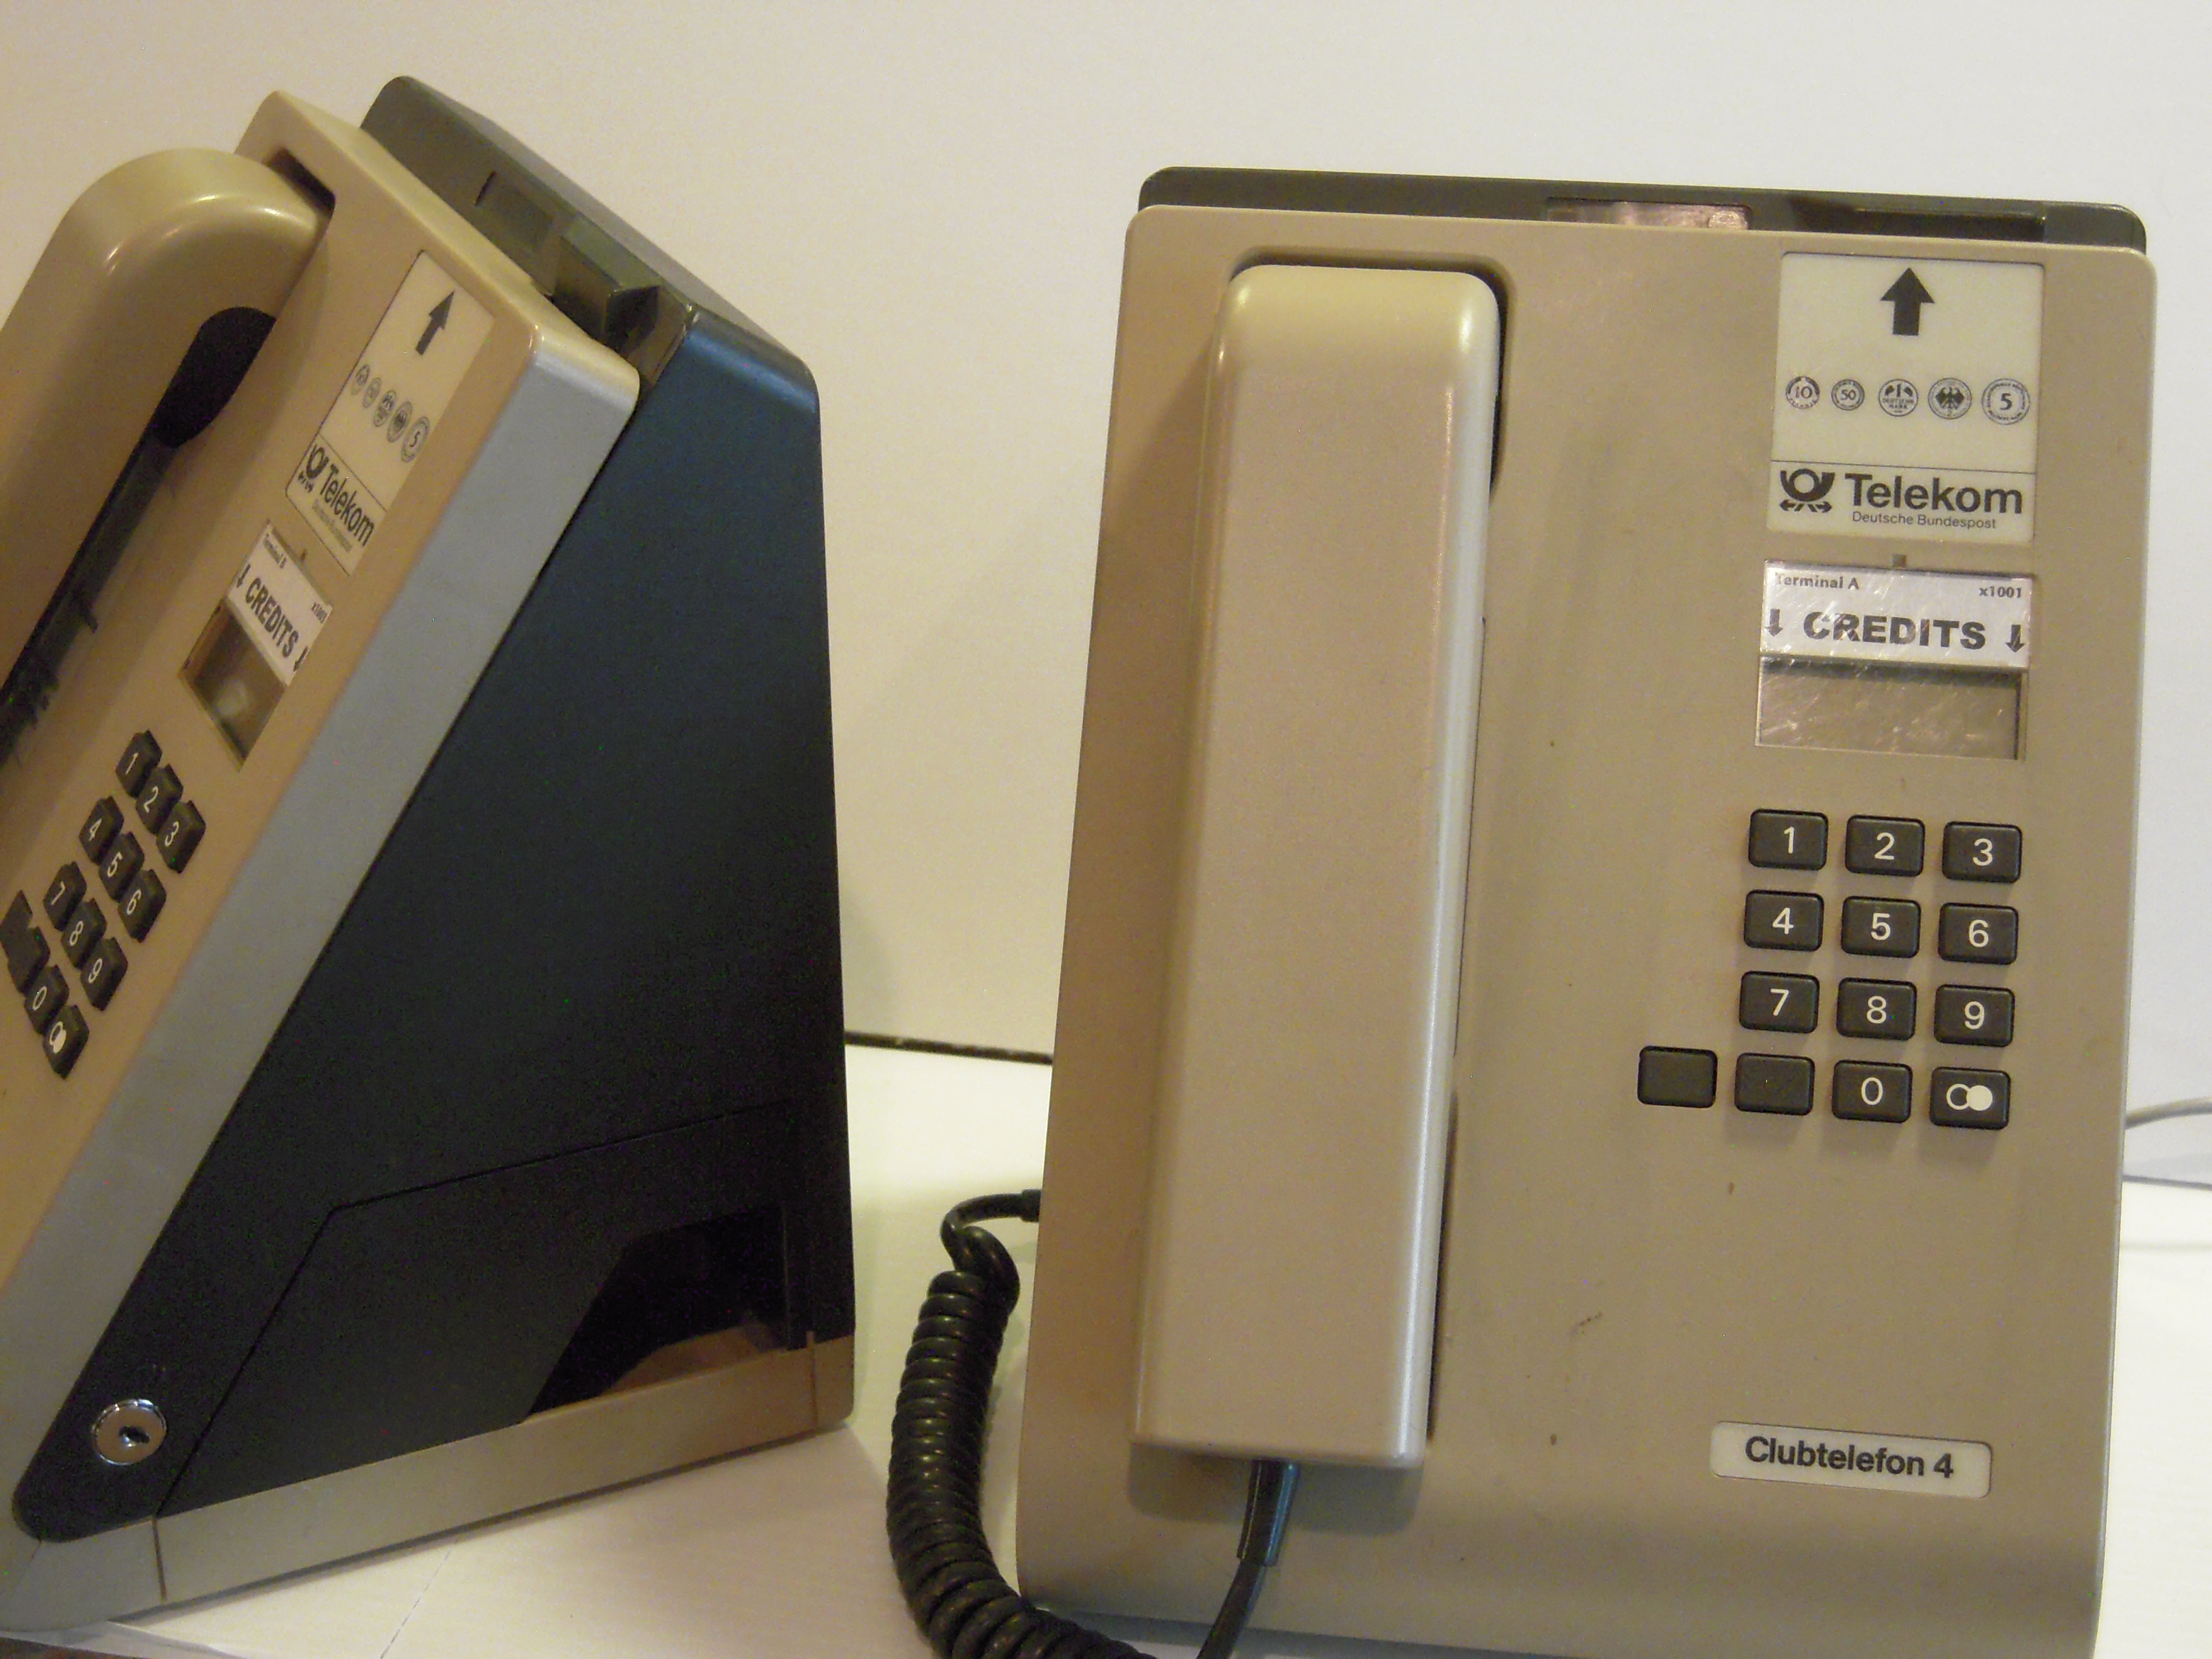
Two “Clubtelefon 4” sets. The coinbox lock and coin return can be seen on the phone at left.
The project documented hereinunder would not have been possible without the assistance of German telephone hobbyist Mathias Herbers, who runs a resource site and Web forum, and personally answered some of my questions. It was inspired in part, at a considerable remove, by Futel. They’re doing some very interesting things which are well worth checking out.
Note : some text on this page is highlighted like this to indicate that you can read an additional note by hovering your pointer over it. I do not actually know what a text–only browser or a screen–reader will do with it.
The “Clubtelefon 4” is a coin–operated pay telephone manufactured in the early 1990s by Landis & Gyr of Switzerland for the Deutsche Bundespost Telekom, which marketed it to proprietors of cafes, campgrounds, and other establishments where customers or visitors might want to make calls. (Both rental and purchase options were offered.) It was thus a type of what is called, in American parlance, COCOT.
Introduced as a cheaper alternative to the earlier “Clubtelefon 1”, which was exclusively a wall–mounted set, it is notable for being lightweight, of largely plastic construction, and fully electronic with microcontrollers and EPROMs inside. Initial uptake was strong, but although the coin mechanism is programmable, no update was released to allow it to accept Euro coins in place of Deutsche Mark coins. Also, it was never equipped to accept the stored–value cards which were very popular in this period. As a result, while the ever–more–rapid proliferation of cellular mobile telephones was gradually eating away at public payphones, the “Clubtelefon 4” quite suddenly became obsolete in 2002.
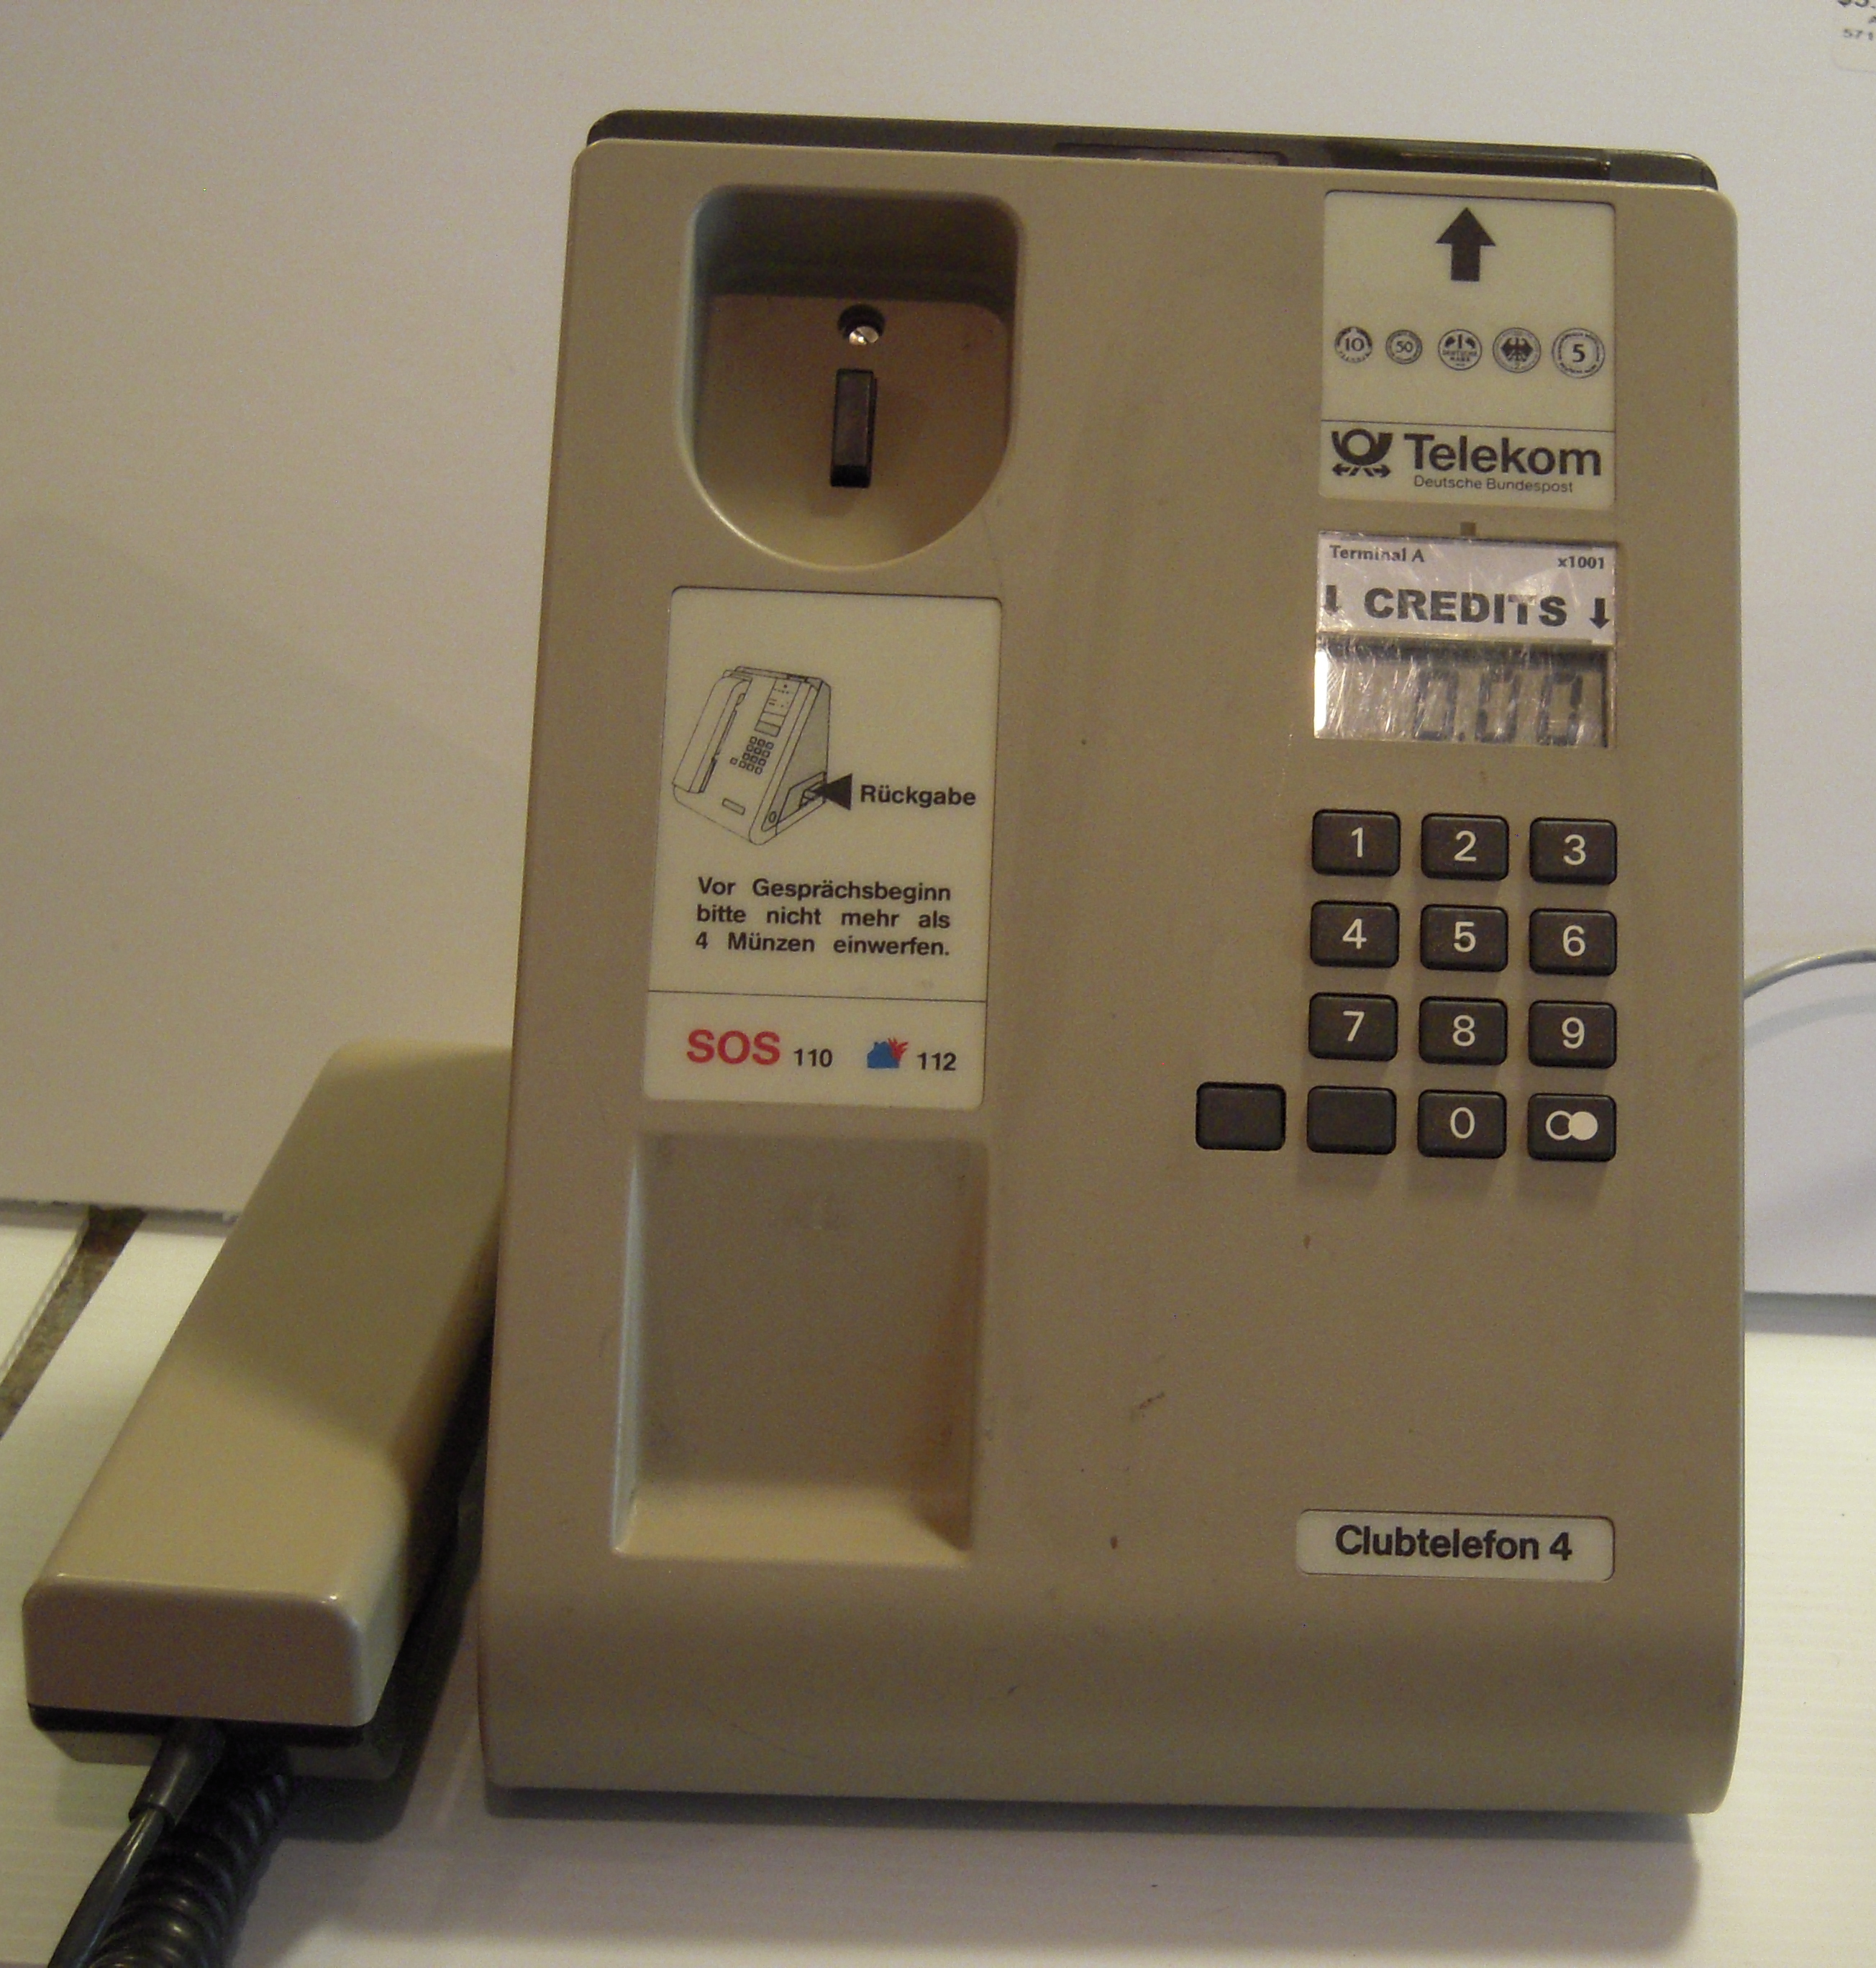
“Clubtelefon 4” sets can be found readily enough, and at reasonable prices, in the German market. (I bought one in Munich, in the spring of 2023, for €30, and then another nearby for €20.) It should be observed that, since the money was collected by the subscriber, not the telephone administration, the money–box lock on each unit is keyed individually, and if you buy a unit without the key, you will have to pay a locksmith to make you a new key. This operation cost me €20 in Munich.
Awkward in shape and oppressively drab in colour, the “Clubtelefon 4” utterly lacks the “conversation piece” appeal of a mid–century dial telephone. Nor is it especially appealing to telephone enthusiasts, partly because of the special effort required to make one work.
I did it, though. How, and to what purpose?
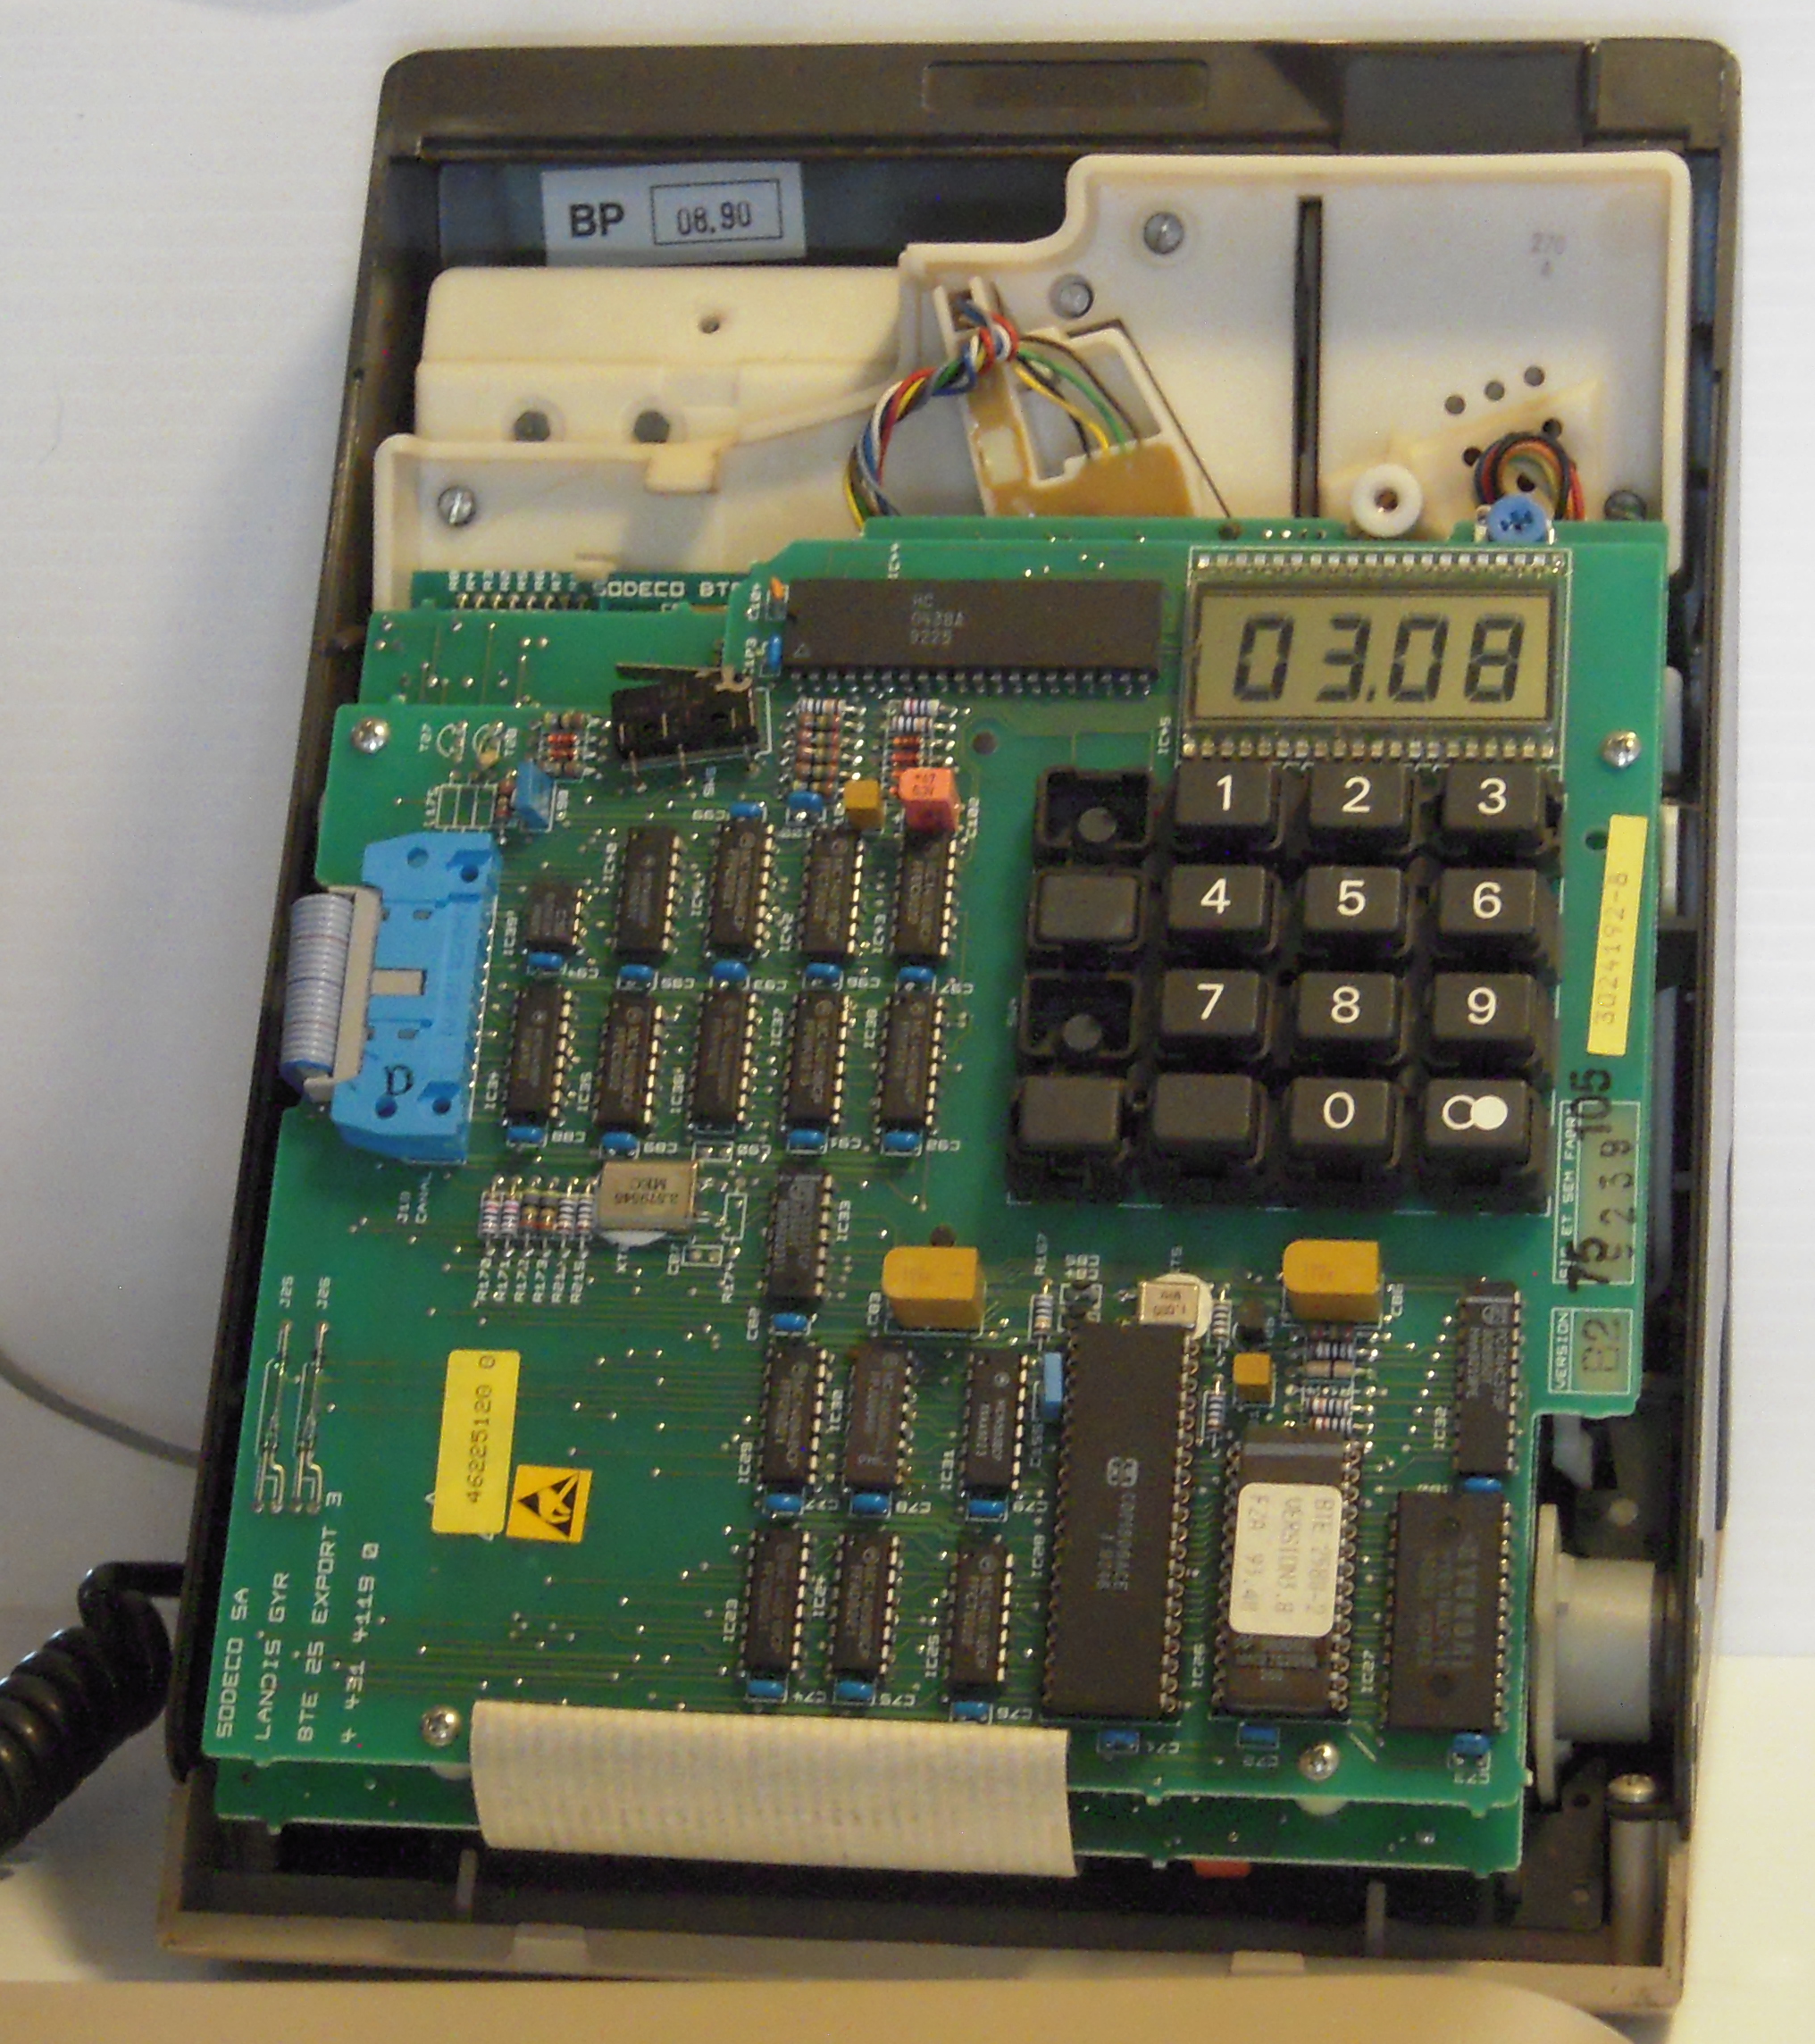
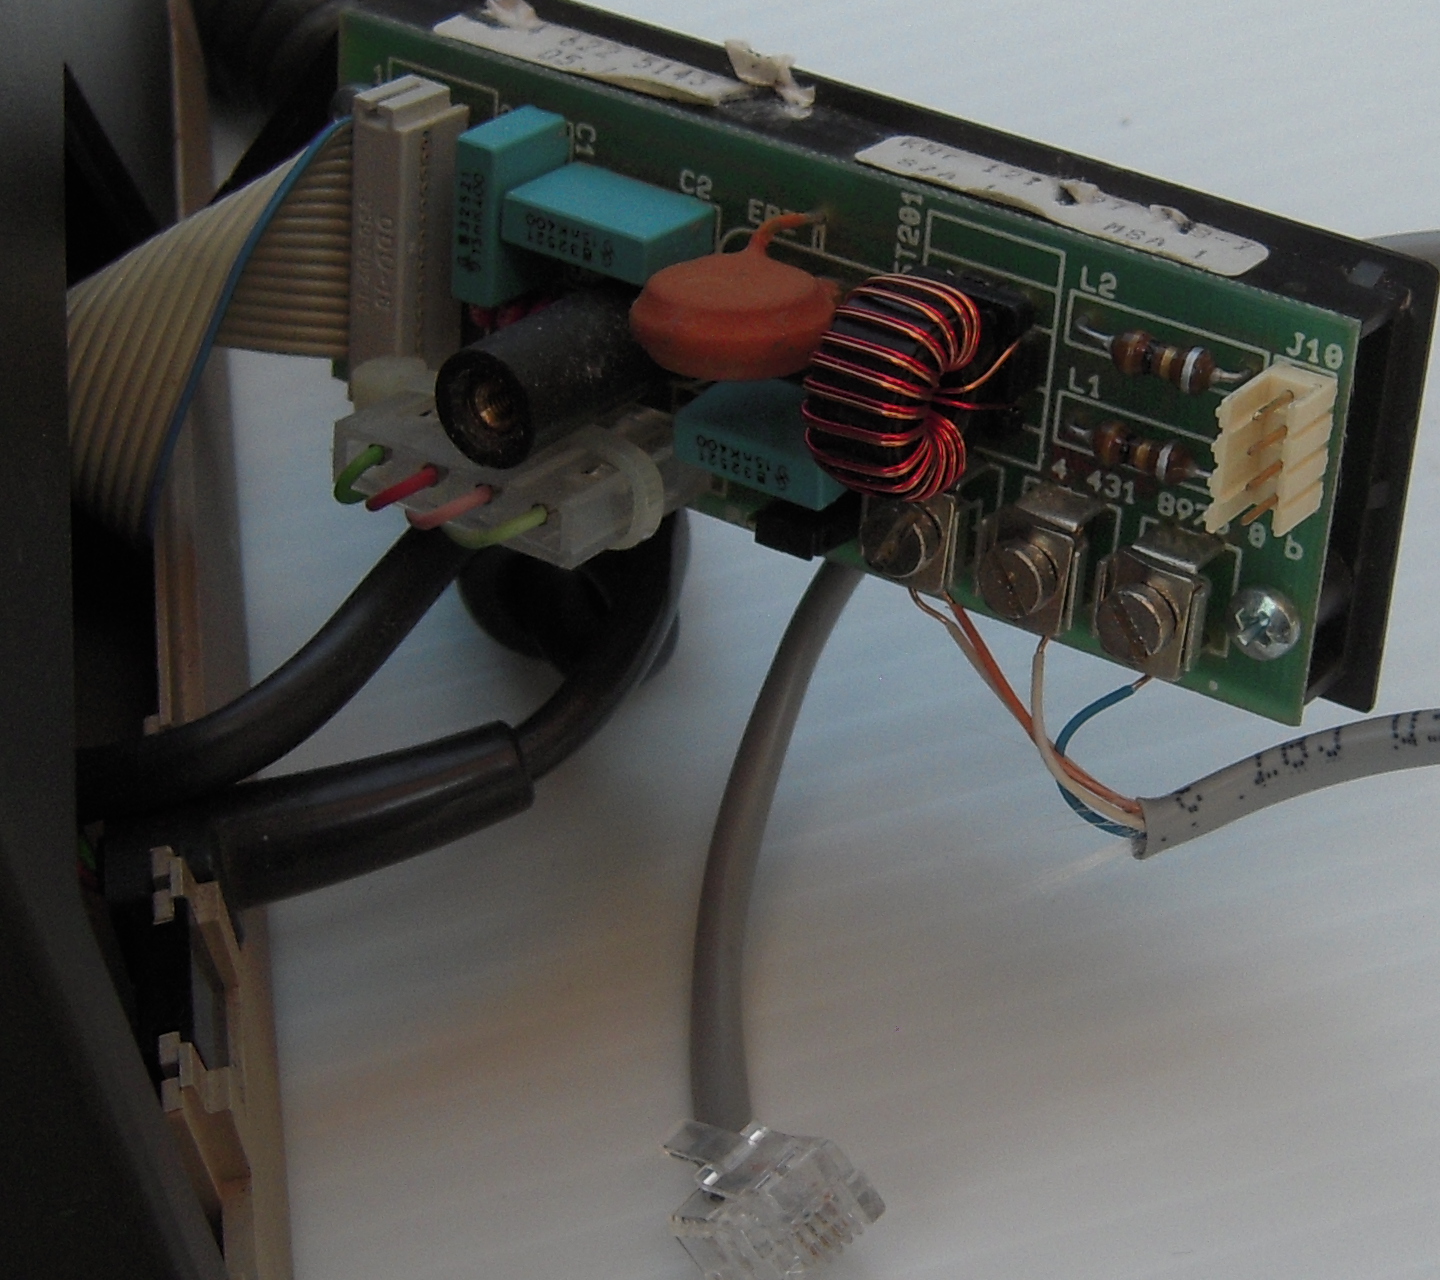
03.08, is displayed on the LCD. (An update to 5.06 is available, but would have to be burned into an EPROM chip.) Note the microswitch at upper left, and the pair of magnetic reed switches at lower left.
A curious feature of the “Clubtelefon 4” is that what appears to be a switchhook, in the receiver cradle, is in fact a recall switch, similar in function to the button on Trimline handsets. Tapping it ends the current call, allowing a new call to be started with the remaining credit, but holding it down does nothing. The actual “hookswitch” is a pair of reed switches on the main circuit board, triggered by a strong magnet in the transmitter end of the handset.
Another is the dialpad, which appears to have thirteen buttons. In fact, the “button” two spaces to the left of the zero is a dummy, which does not depress. The purpose for making this opening in the faceplate can only be guessed at. Also, the buttons to left and right of the zero are not the usual “asterisk” and “octothorpe”. Many dial–in applications require these “special characters”, which are probably omitted because the “Clubtelefon 4” is switchable between pulse and tone dialing, with pulse the default. The unmarked button to left of zero is only used for making selections from the setup menu, and the one to right of zero, with what looks like the MasterCharge™ symbol, re–dials the last called number.
A fact of great importance to the hobbyist is that charging, in the “Clubtelefon 4”, is local.
In other words, the typical American–style pay phone requires the central office to register payment and
connect and disconnect the call.
The “Clubtelefon 4” accounts for money internally.
It registers a credit balance based on the coins accepted, and is triggered to deduct from this balance by bursts
of 16 kHz metering tone
from the central office.
In the absence of these tone bursts, it handles calls without charging,
behaving pretty much like any standard telephone.
Most telephones descended from Bell’s original can be made to function on a simple two–wire system, with a modest amount of loop current. For hobbyist purposes today, there is rarely any need to build special equipment, because the place of a central office can be supplied by a convenient device called an “Analog Telephone Adapter”, created to allow ordinary sets to be used for Voice–over–Internet–Protocol telephony. The typical ATA has one 8p8c modular connector for Ethernet and one or two 6p2c “FXS” connectors for telephones, and may be little larger than a packet of cigarettes. Generally speaking, ATAs are designed to support telephones with characteristics defined by Western Electric, the manufacturing arm of the US Bell System, viz, 48 V DC bias on–hook, with an off–hook loop current of 20 mA, and 20 Hz ringing current at 90 V peak–to–peak. Similar characteristics are common to most analog PBX hardware. Such a device will not operate the “Clubtelefon 4”.
The “Clubtelefon 4” takes its power from the telephone line, and although great care was taken with the circuitry, it does require considerable power. In particular, there are solenoids to be actuated in the coin mechanism. Therefore it is necessary to provide a line conforming to Deutsche Bundespost standards, which call for 60 V bias, and a loop current of 32 mA. ATAs which can handle this are not common, but they do exist. The AudioCodes MediaPack™ MP–112 is one such.
A further highly satisfactory feature of the MP–112 is that it can be programmed to send the 16 kHz metering tones required by the “Clubtelefon 4” to function as a pay telephone, in addition to providing the means of dialing and ringing, placing and accepting calls. To make this feature work is, however, not exactly straightforward.
The maker of the MP–112 and its sister models (MP–114, –118, and –124) provides an extensive user manual, running to over 600 pages. Unfortunately, this documentation is quite opaque. It does not provide much in the way of guidance in the task of bridging a telephone and a telephony server. I did, however, find some helpful information on the Web in the form of two simple tutorials (here and here) on one site.
To start with, I focused on getting one of the FXS ports working with a SIP server over the Internet, and an ordinary telephone. (If you are an SDF member, the SDF VoIP server is ideal for this.) Since I had a European telephone available, I navigated to the submenu
Configuration » VoIP » Media » Analog Settings
and set FXS Coefficient Type to Europe
for proper impedance matching.
Once I was able to make and receive calls, the next step was to download the configuration file from the ATA,
edit it to insert the relevant line, and re–upload it.
EnhancedFXSLineCurrent = 2
For some reason, this setting is not accessible from the Web interface.
As I had hoped, with this setting, the ATA indeed supplied the power needed for the “Clubtelefon 4”.
With the phone
part working, it was time to get on with the pay
part.
According to the user manual for the MP–112, metering tones can be configured from a sub–menu in the Web interface :
Configuration » VoIP » GW and IP to IP » Analog Gateway » Metering Tones
Note that, in the Web interface, many pages have a selector at the top allowing a choice between Basic Parameter List
and Advanced Parameter List
, where the text indicates the choice which is not currently being displayed.
Advanced is the mode that is wanted.
By itself, setting Generate Metering Tones to Internal Table
and Metering Tone Type to 16 kHz achieves no visible result.
It is, as the documentation indicates, necessary to create a Charge Codes Table,
and this can be done via a link on the Metering Tones sub–menu page, or alternatively from :
Configuration » VoIP » GW and IP to IP » Analog Gateway » Charge Codes
Up to 25 charge codes can be set up, each with different charging rules for up to four time periods on a 24–hour cycle.
For my purposes this was entirely unnecessary.
In the first set of fields (Time Period 1), on the first line (Index 0),
I put 00
in the End Time field, 600
in the Pulse Interval field,
and 0
in the Pulses on Answer field.
The effect of this is to send out a metering pulse every minute during the course of the call.
At this point, if you connect up the phone, put a coin in, and place a call, you might expect to see the credit balance on the LCD going down. But you won’t! A further step is yet necessary. According to the documentation :
Charge Code rules can be assigned to routing rules in the Tel to IP Routing. When a new call is established, the Tel to IP Routing is searched for the destination IP address. Once a route is located, the Charge Code (configured for that route) is used to associate the route with an entry in the Charge Codes table.
Using the MP–112 with SIP VoIP services (such as the one SDF provides) does not ordinarily require this step. First we find the necessary sub–menu :
Configuration » VoIP » GW and IP to IP » Routing » Tel to IP Routing
For the very simple pay operation as contemplated here, it is only necessary to fill in the first row of the table.
The first field, Source Hunt Group ID, can be filled in with 0
—
it is (thankfully!) not necessary to set up Hunt Groups for this purpose.
The next two fields, Destination Phone Prefix and Source Phone Prefix,
can be filled in with *
to match all calls.
The Destination IP Address field will eventually be filled in with the IP address of our Asterisk server,
but for now, a domain name such as sip.sdf.org
can be inserted,
assuming that domain name resolving servers have been configured.
Transport Type is set to UDP
, and 0
is inserted in the IP Profile ID
and Charge Code fields.
Everything else can be left at default values.
Of course, if you want to have the ATA connected to a network and use it for regular calls (without charging)
as well as for this specialized purpose, you will need at least two lines in the Tel to IP Routing table,
one matching only those calls which should be sent to the Asterisk server, and the other matching everything else.
At this point, I turned to setting up the Asterisk server — see below.
I set the two FXS ports of the ATA to identify themselves as 1001 and 1003,
and created the corresponding extensions in the Asterisk configuration file pjsip.conf,
with the Secret
or password for authentication.
Then, from the sub–menu
Configuration » VoIP » GW and IP to IP » Analog Gateway » Automatic Dialing
I set the two ports to dial, respectively, 1000 and 1002, three seconds after going off–hook. This brief delay accounts for the fact that it can take the electronics of the “Clubtelefon 4” a few moments to switch on. After being disconnected for an extended period, a minute or two off–hook is required for charging. A considerably longer delay is a sign, either that the loop current is insufficient, or that the electronics in the telephone have failed in some way.
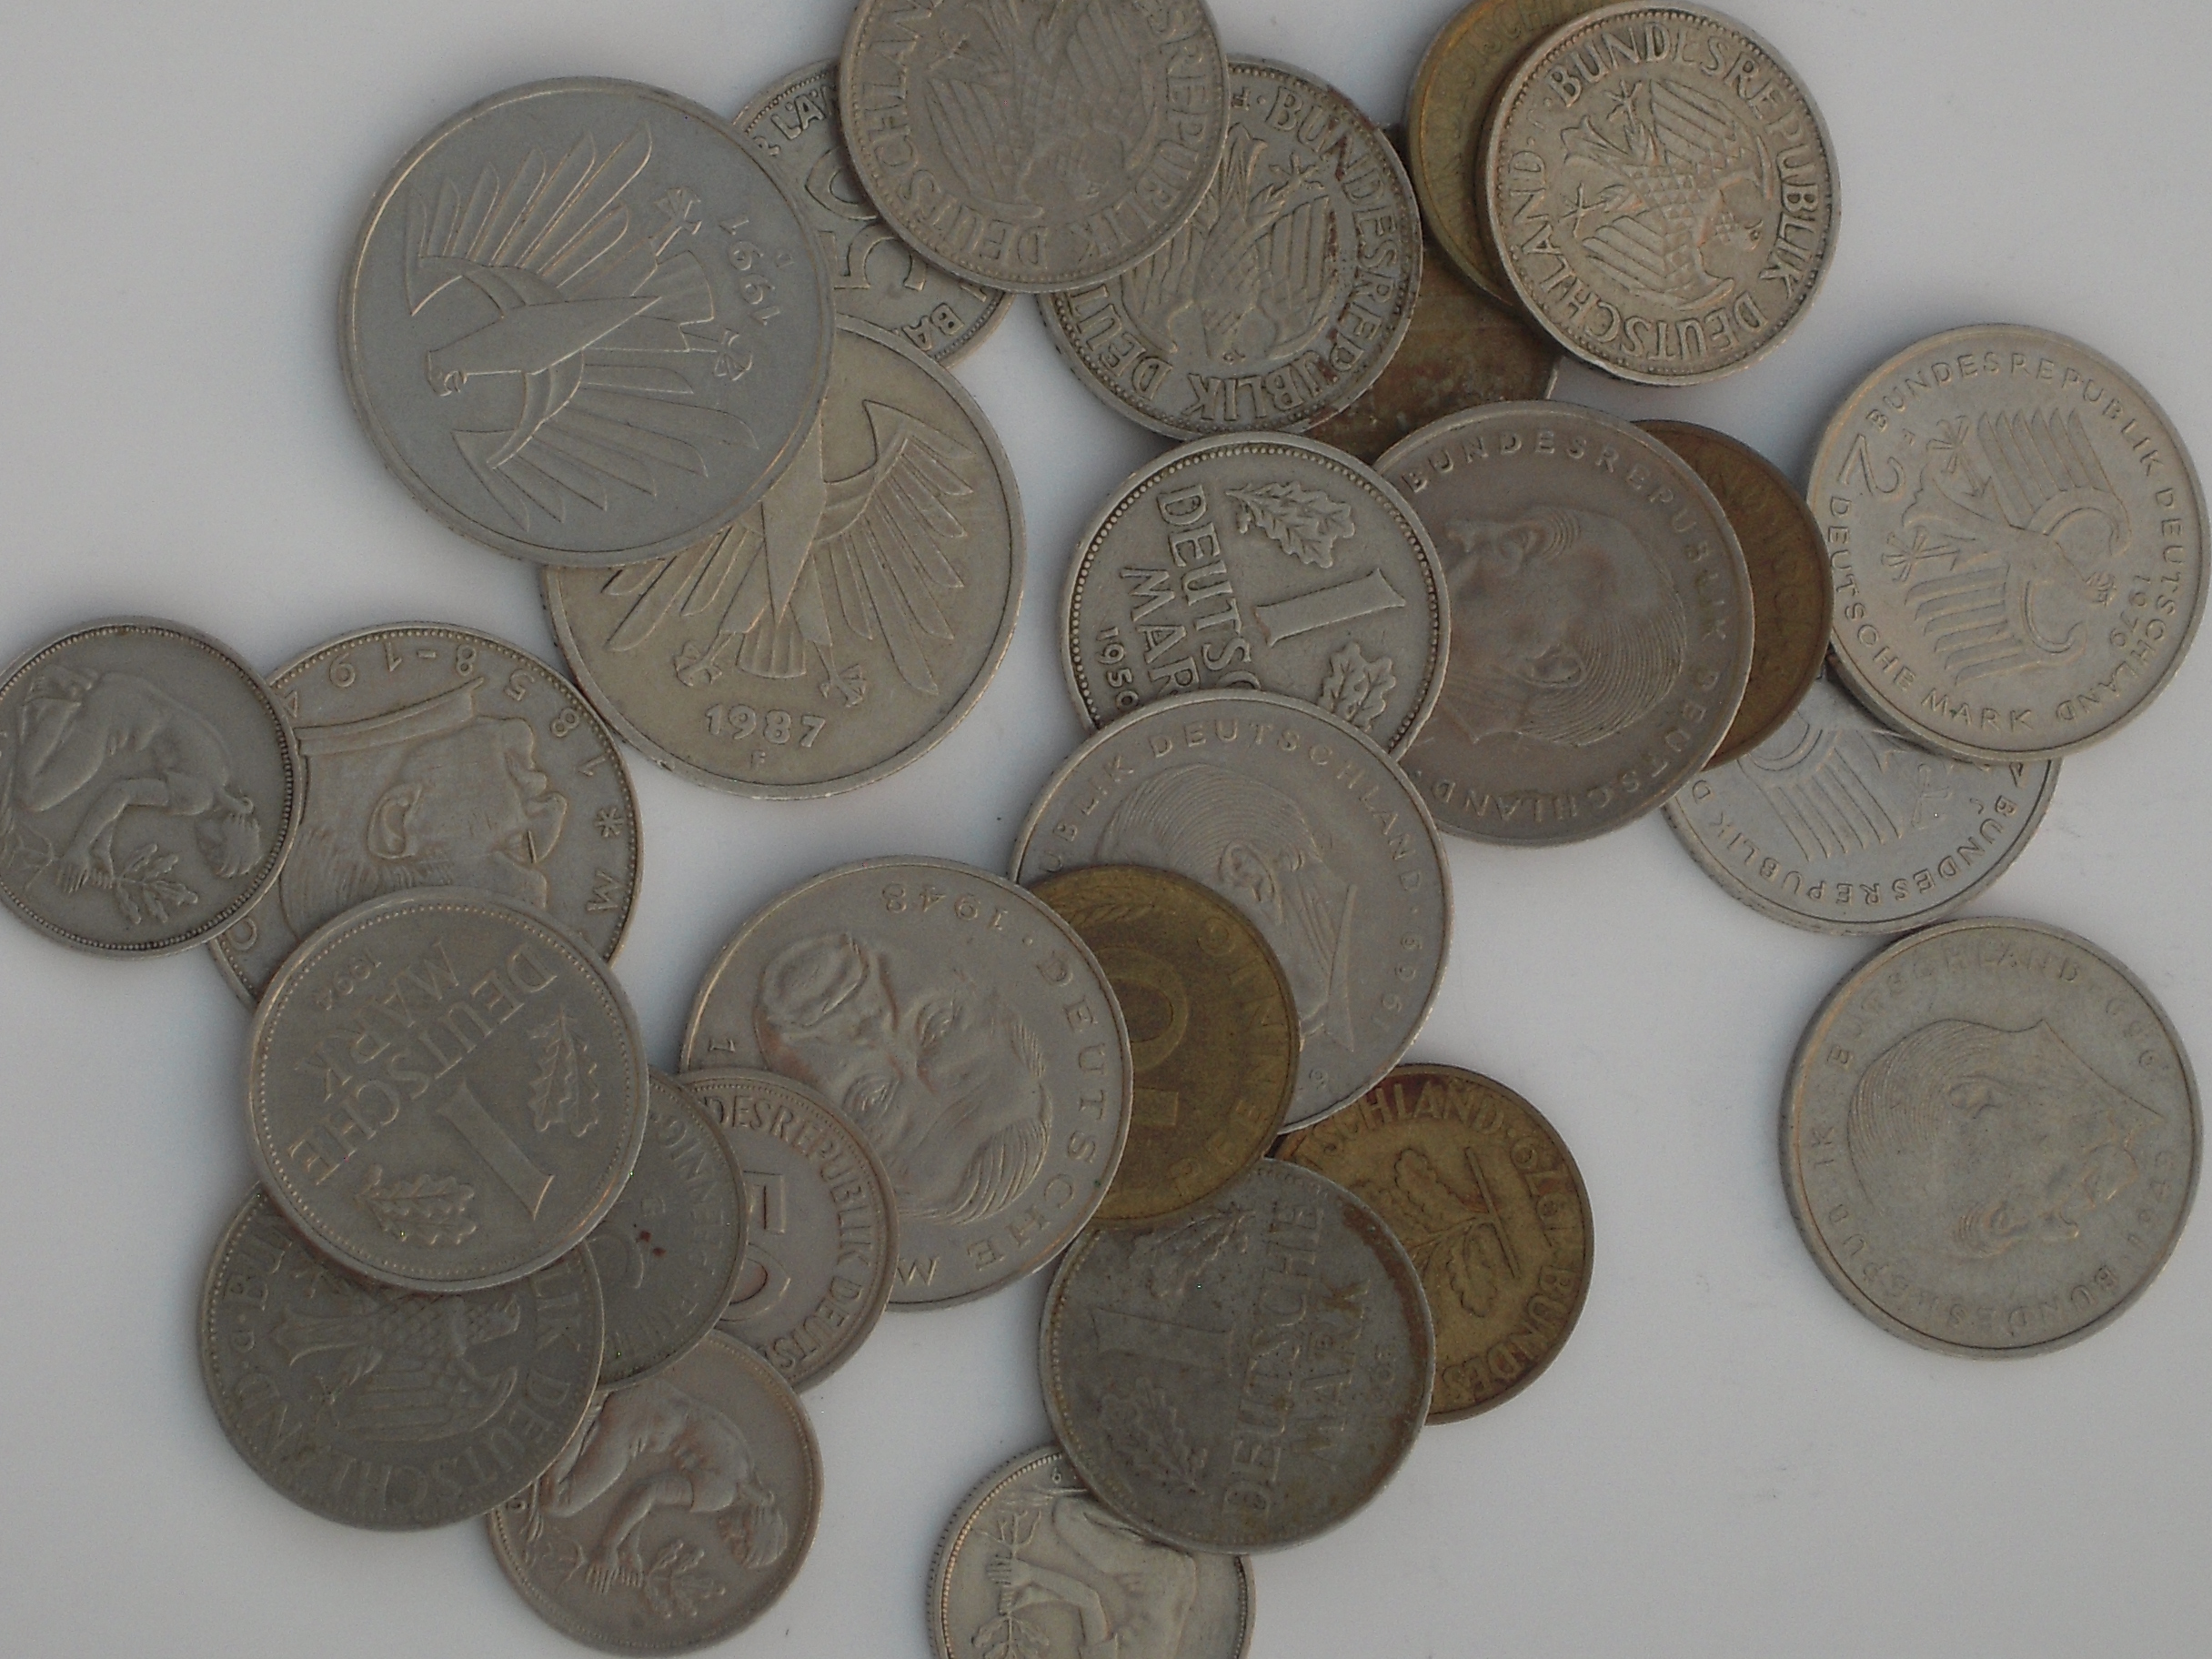
The coin mechanism of the “Clubtelefon 4” accepts the 10 pfennig, 50 pf, 1 Deutsche Mark, 2 DM, and 5 DM denominations. The sophistication of this mechanism can be appreciated from the fact that the 10 pf is plated steel, strongly attracted to a magnet ; the 50 pf and 1 DM are cupronickel, non–ferromagnetic ; and the 2 DM and 5 DM are nickel–cupronickel “sandwich” coins with special magnetic properties. (The solid cupronickel 2 DM with the portrait of Max Planck is not accepted.) Nevertheless, my investigation has found that it is possible to “slug” the coin–acceptor with certain quite common coins, which may be a good deal cheaper to acquire, since the German coins are still redeemable at the rate of approximately €1 for 2 DM. Ultimately, I would like to have my own telephone tokens made — I am no stranger to private minting.
The “Clubtelefon 4” is designed to be set up by the subscriber, to suit the situation where it is installed. He can allow guests to make brief courtesy calls for free, or if he finds that they are making too many long calls, he can raise the price to discourage hogging the phone. Specifically, the charging steps can be selected, zero to 1 DM 50 pf on the first metering tone received from the central office, and 20 pf to 1 DM for each metering interval thereafter, in 10 pf increments. Also, the acceptance of each coin denomination can be enabled or disabled individually. The mechanism is capable of holding multiple coins at one time, the number depending on denomination ; for the 1 DM, it is two.
For my purposes, I have found it best to set the first–unit charge to zero and the subsequent–unit charge
to 20 pf, and accept only 1 DM coins.
Thus each token
registers 1·00 credit
, which is good for five minutes.
| First Unit Charge | Each Additional Unit | First Unit | Further Units | First Unit | Further Units | First Unit | Further Units |
| For certain combinations, the acceptance of 10 pf coins is automatically disabled. | |||||||
| none | 20 pf | 40 pf | 20 pf | 80 pf | 20 pf | 1,20 DM | 20 pf |
| 30 pf | 30 pf | 30 pf | 30 pf | ||||
| 40 pf | 40 pf | 40 pf | 40 pf | ||||
| 50 pf | 50 pf | 50 pf | 50 pf | ||||
| 60 pf | 60 pf | 60 pf | 60 pf | ||||
| 70 pf | 70 pf | 70 pf | 70 pf | ||||
| 80 pf | 80 pf | 80 pf | 80 pf | ||||
| 90 pf | 90 pf | 90 pf | 90 pf | ||||
| 1 DM | 1 DM | 1 DM | 1 DM | ||||
| 10 pf | 20 pf | 50 pf | 20 pf | 90 pf | 20 pf | 1,30 DM | 20 pf |
| 30 pf | 30 pf | 30 pf | 30 pf | ||||
| 40 pf | 40 pf | 40 pf | 40 pf | ||||
| 50 pf | 50 pf | 50 pf | 50 pf | ||||
| 60 pf | 60 pf | 60 pf | 60 pf | ||||
| 70 pf | 70 pf | 70 pf | 70 pf | ||||
| 80 pf | 80 pf | 80 pf | 80 pf | ||||
| 90 pf | 90 pf | 90 pf | 90 pf | ||||
| 1 DM | 1 DM | 1 DM | 1 DM | ||||
| 20 pf | 20 pf | 60 pf | 20 pf | 1 DM | 20 pf | 1,40 DM | 20 pf |
| 30 pf | 30 pf | 30 pf | 30 pf | ||||
| 40 pf | 40 pf | 40 pf | 40 pf | ||||
| 50 pf | 50 pf | 50 pf | 50 pf | ||||
| 60 pf | 60 pf | 60 pf | 60 pf | ||||
| 70 pf | 70 pf | 70 pf | 70 pf | ||||
| 80 pf | 80 pf | 80 pf | 80 pf | ||||
| 90 pf | 90 pf | 90 pf | 90 pf | ||||
| 1 DM | 1 DM | 1 DM | 1 DM | ||||
| 30 pf | 20 pf | 70 pf | 20 pf | 1 DM 10 pf | 20 pf | 1,50 DM | 20 pf |
| 30 pf | 30 pf | 30 pf | 30 pf | ||||
| 40 pf | 40 pf | 40 pf | 40 pf | ||||
| 50 pf | 50 pf | 50 pf | 50 pf | ||||
| 60 pf | 60 pf | 60 pf | 60 pf | ||||
| 70 pf | 70 pf | 70 pf | 70 pf | ||||
| 80 pf | 80 pf | 80 pf | 80 pf | ||||
| 90 pf | 90 pf | 90 pf | 90 pf | ||||
| 1 DM | 1 DM | 1 DM | 1 DM | ||||
These functions are provided through the dialpad by a simple menu, triggered by pressing a button which is accessible when the coin box is removed. The current menu position is indicated on the four–digit LCD above the dialpad, normally used for indicating either the number being dialled or the remaining credit.
The menu can also be activated from a concealed button on the dialpad, if the front panel is removed (using one screw behind the number plate and one in the receiver cradle). In this case there are additional selections, including a REPROG function. This makes it possible to finely adjust the acceptance criteria of the coin mechanism, by feeding in coins which should be accepted. According to the documentation, incautious use of REPROG may lead to the undesired acceptance of foreign coins — which could, for present purposes, be helpful.
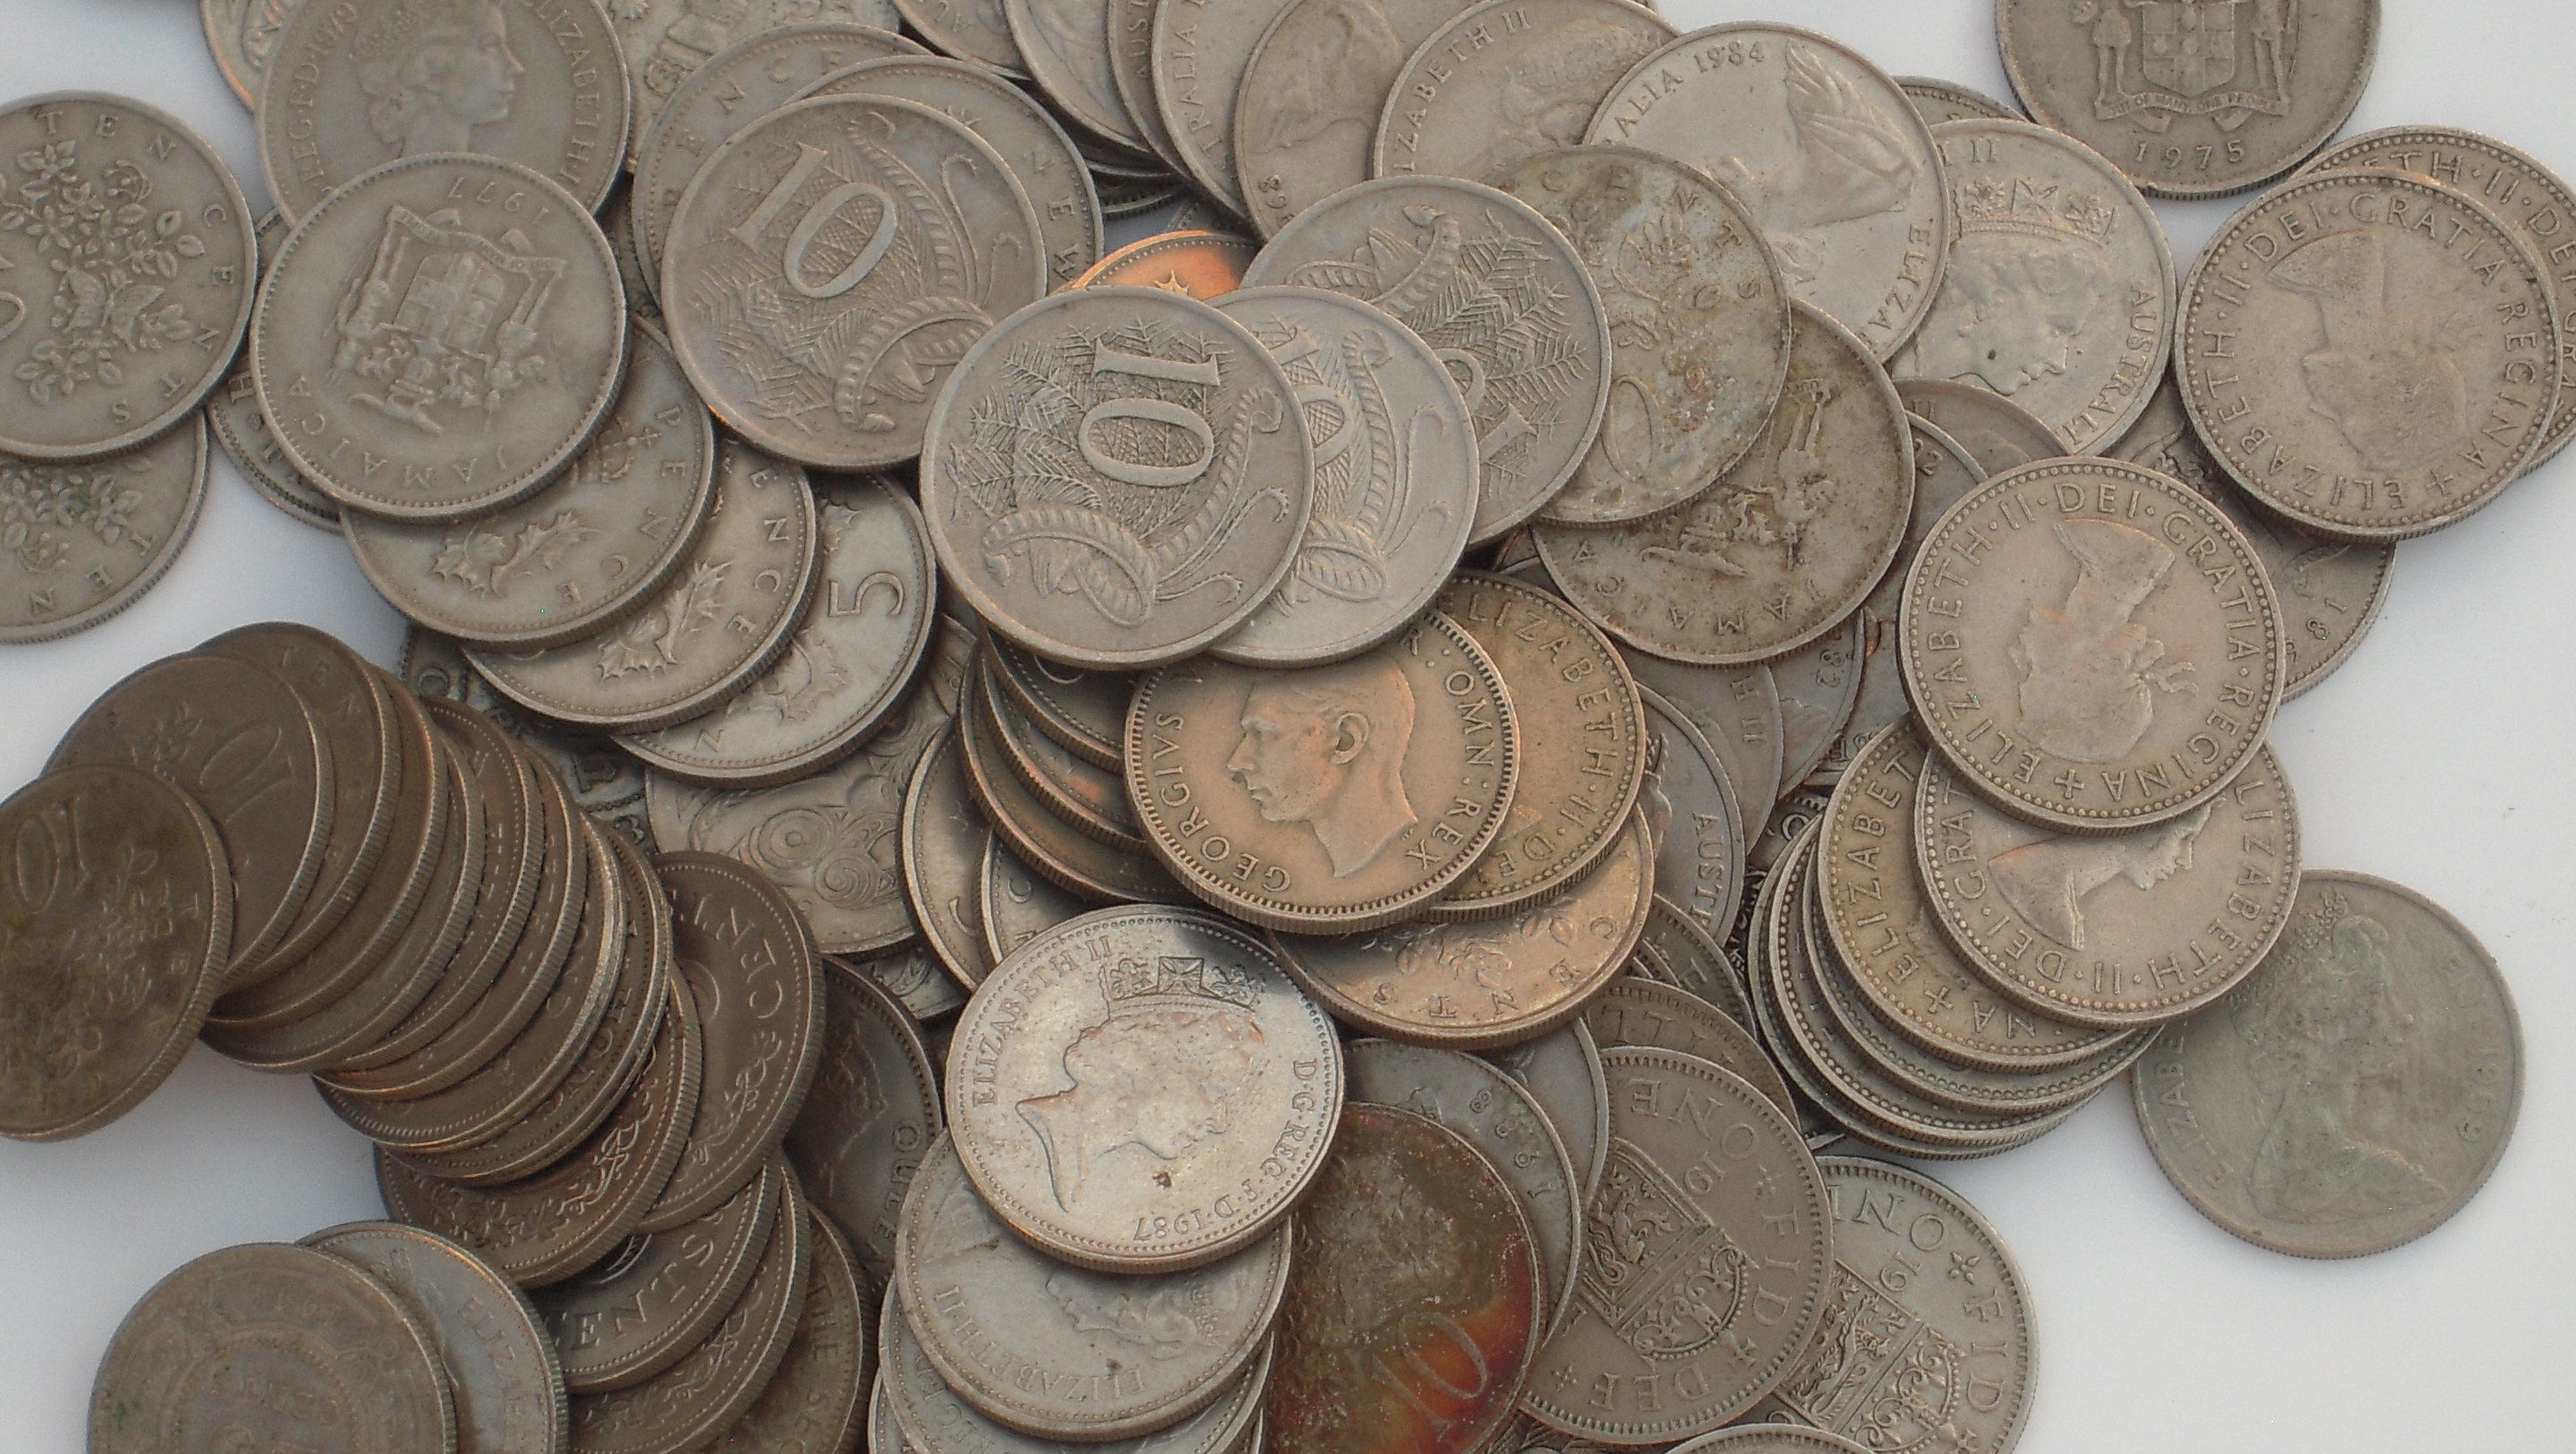
The 1 DM coin is composed of 75% copper, 25% nickel alloy. Its standard mass is 5·5 grams, and its diameter 23·5 millimeters. By direct test, the Mexican 10 centavos coin of 1936—46, which has the same mass and diameter, and the unusual composition 80Cu/20Ni, is not accepted. Nor is the Bahamas cupronickel 10 cent coin, 5·54 g, 23·5 mm, with the fluted edge. (Its angular momentum, being distributed differently, will cause it to roll down an incline at a different speed.) There is, however, quite a variety of cupronickel coins of approximately 5·7 g, 23·6 mm, which are readily accepted. Most of these have common ancestry in the British coinage reform of 1818, which divided the Troy pound weight of standard silver into 66 shillings (a slight embasement from the 62–shilling standard which had prevailed since the days of Elizabeth I).
The above is far from an exhaustive list. It includes only coins I have actually tested, and leaves out other obvious equivalents, such as the New Zealand shilling of 1947—65. The Hong Kong 50 cents of 1951—75, slightly heavier at the same diameter, seems to work acceptably. Unexpectedly, the Republic of Korea 100 won (1970—2019), 5·42 g, 24 mm, actuates the mechanism, even after a run of the REPROG procedure with 1 DM and shilling coins. Also the Guatemalan 10 centavos of 1965–2019, 3·2 g, 21 mm, 61Cu/20Zn/19Ni composition, seems to be readily accepted in place of the 50 pf, 3·5 g, 20 mm. Probably the difference in electromagnetic properties has something to do with the latter.
The ATA is designed to provide an analog endpoint for an Internet–protocol telephony service. To make it do anything interesting therefore requires some type of IP telephony server. Happily, there is a widely–used and well–supported free software for this purpose, known as Asterisk. The Asterisk software can be run on a fairly lightweight computer.
I started out using a Toshiba NB–205 netbook, with an Intel Atom™ processor,
Designed for Windows™ XP
, which had been sitting unused.
The first step was to install Slackware Linux on this machine,
because it is the rare major Linux distribution which still supports the 32–bit x86 architecture.
Then I compiled Asterisk 16.15.0 (entirely adequate, although development had reached 20.4 by July of 2023)
from source using the relevant
SlackBuild.
I edited the script slightly, so that PJSIP support, music–on–hold, and extra
sounds would not
require passing options, and you are welcome to use
my version.
Subsequently I switched to a Raspberry Pi 3 Model B+, running PiOS, and using Asterisk (also 16.15) from the standard repository package. For some reason, this installation provides the standard audio files in GSM format, which is unlikely to be wanted, but other formats can be had from the source packages on the SlackBuild page linked above. Conveniently, the default for this installation starts Asterisk when the computer boots up, so there is no need to log in and start it.
So far, this small single–board computer has proven entirely equal to the task of serving two telephones. In the future, I may find out how well it holds up under the load of four simultaneous calls, with the MP–114.
Because my intention was to create a stand–alone kiosk which could be set up anywhere power was available, without relying on network access to the outside world, I configured both the ATA and Asterisk server with static IP addresses. My method was to connect both devices to my home network, while I was tinkering with them, and once I had everything working, to take note of the IP addresses assigned to them by the router, and edit the configuration files with those addresses. From then on I connected the two together with a short length of Ethernet cable.
This was not quite as simple as it first sounds. In the factory–reset condition, the MP–112 has a static IP address of 10.10.1.10, whereas most home networks are addressed in the 192.168 range. The option to activate DHCP, that is, to instruct the ATA to obtain its network address from the router, seems to be available only through the built–in voice menu. This did not work straightaway, and required several tries. I recommend setting an IP address compatible with the local network directly from this menu, rather than bothering with DHCP. Alternatively, with DHCP enabled, it may not be necessary to configure a static IP, as the Asterisk server computer could run a DHCP server. I can only report what I was ultimately able to make work.
In UNIX, it is often said that everything is a file
.
In Asterisk, it can almost be said that everything is an extension
.
Each entry in the dialplan
is a sequence of events, which may, but need not, include connecting one
endpoint
(telephone) to another.
I was quite pleased when I worked out how to create an extension which would randomly select one from a pool of
recordings to play back, each time it was connected to.
As stated above, I had defined the two FXS ports on the ATA as extensions 1001 and 1003.
Since these endpoints were to be reached, from the Asterisk server, via SIP,
they also had to be defined in the configuration file pjsip.conf.
In this file, these two extensions are restricted to calling in to a context
designated
from-internal.
This designation is used in the sample documentation, but does not appear to be any type of special reserved keyword,
so presumably anything could be used.
The configuration file extensions.conf defines the context from-internal, and within it
the two extensions 1000 and 1002, which are automatically dialed from 1001 and 1003 respectively by the ATA.
They then immediately pass the call to a further context, which is the first level of the actual menu.
Each sub–menu is its own context in turn, so that dialing 55
after 4
gives a different result than after dialing 5
.
This structure could presumably be simplified somewhat.
On the other hand, if the Asterisk server were to be connected to the Internet,
it would be desirable to take measures to secure it against unwanted access.
By a convention going back more than 50 years, digital audio in telephone systems is sampled at 8000 Hz,
and quantized into 8 bits, according to one of two non–linear pulse–code–modulation schemes,
known as μ–law
and A–law.
(The two are, it is generally agreed, roughly equivalent in overall sound quality.)
Audio clips packaged with the Asterisk system usually come as files with three extensions .alaw,
.ulaw, and .wav, where the last is 8 kHz 16–bit linear PCM
(and, of course, monaural).
While Asterisk is capable of accepting and interconverting among these and other formats,
I chose to avoid loading the processor and memory of my server unnecessarily.
Purely for consistency with a European phone, I instructed the ATA to request A–law audio
(also referred to as “G.711 A”, after the
relevant technical recommendation document from the ITU–T).
Some audio editing tools allow saving a .wav containing A– or μ–law
PCM, but such a file, renamed to .alaw or .ulaw, may play back with a loud popping noise
at the start, owing to the presence of header data.
I found it expedient instead to render a monaural 16–bit LPCM file of whatever sampling rate to the desired
target format using the following command :
ffmpeg -i foo.wav -c:a pcm_alaw -ar 8000 -f alaw foo.alaw
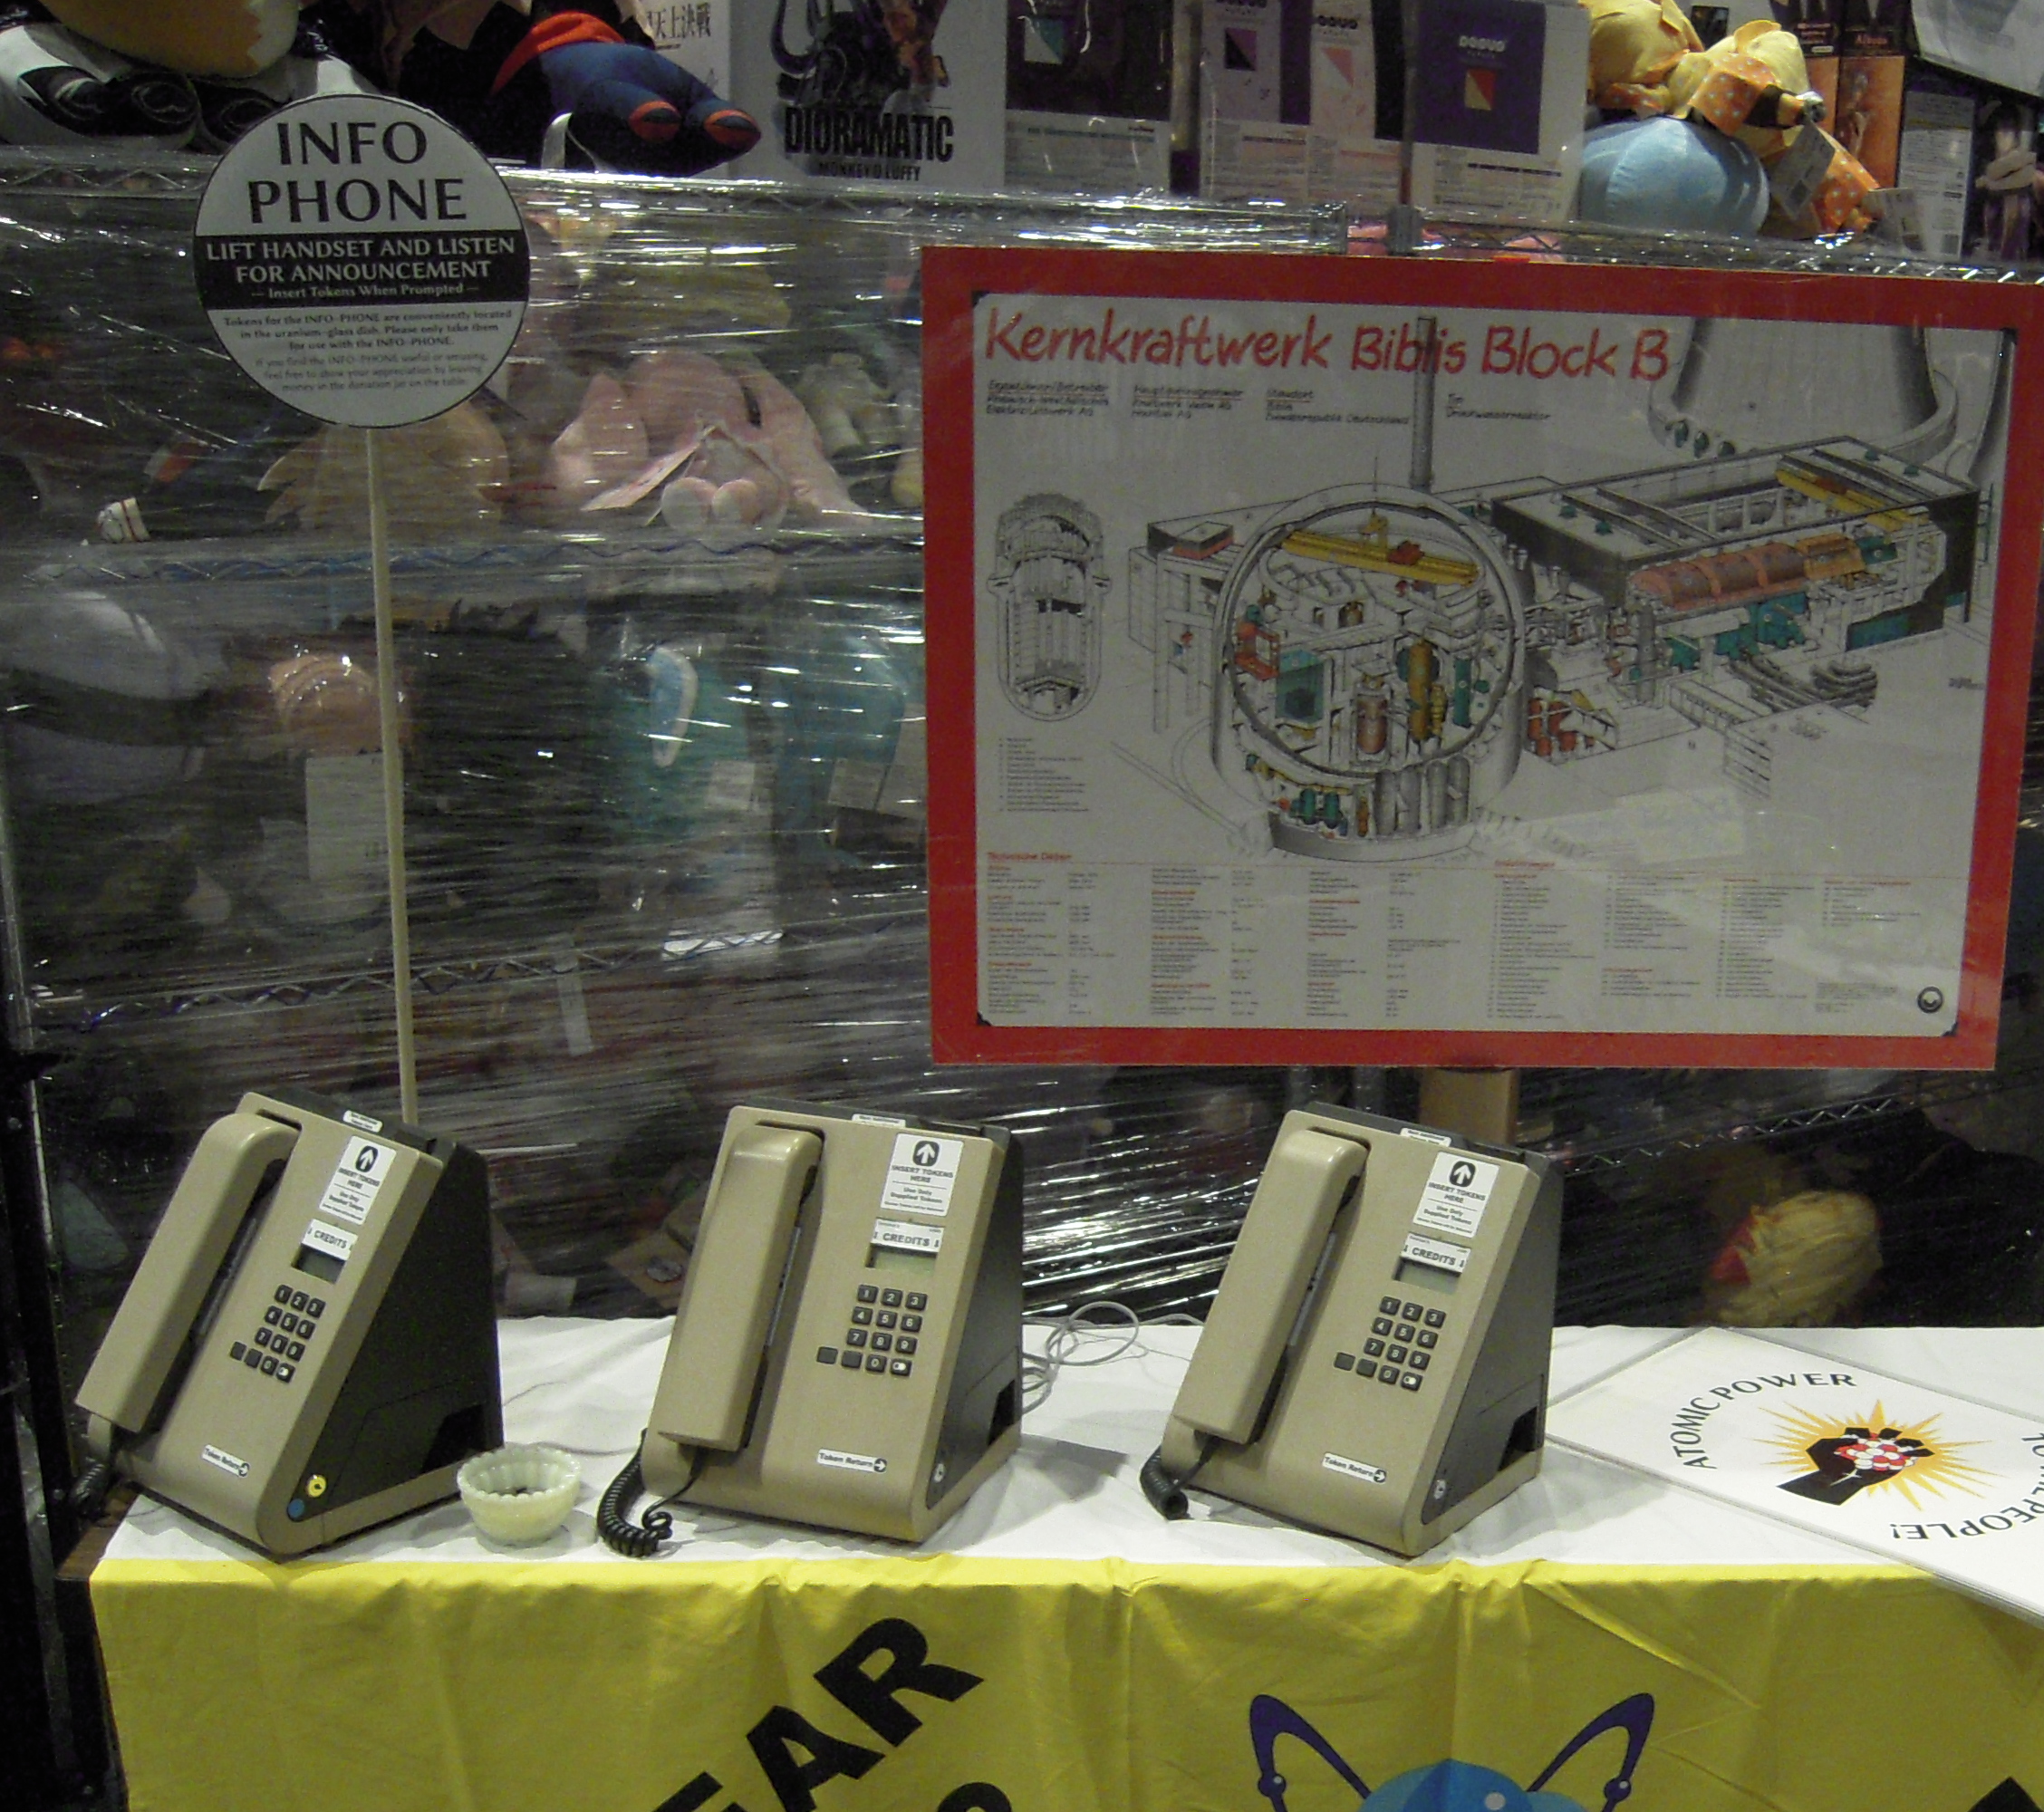
When I bought my first “Clubtelefon 4”, I had no clear idea what I was going to do with it, assuming that I could even make it work. I was just intrigued. By the next morning, I had formed the idea of incorporating it into some sort of information kiosk. This would then become a component of the educational displays on nuclear energy which I periodically present.
My first thought was the ambitious one of using it as the audio terminal, selector, and pay–station for a coin–operated cinema which would present films from among those I have had transferred to video. This is an idea I may yet revisit.
Before long, however, it occurred to me that I had purchased several vinyl records, containing public–information segments produced for radio broadcast by entities such as the US Atomic Energy Commission and the American Nuclear Society. These would be ideally suited for an audio–only presentation format, which could be handled using an ATA, a small portable computer as an Asterisk server, and the telephone, without any other special equipment.
A prime consideration in constructing the voice menus was the sheer number of selections, more than 60. Simply to listen through my brief description of each one, a few seconds per selection, would take several minutes, and the listener might well become lost. This, and the fact that the selections came (as it were) pre–grouped, led me naturally to a multi–tier menu system.
A peculiarity which affects the way I constructed the menus is that, on one of the telephones I acquired, pressing the 1 or 2 button does not always dial a digit. The 3 is better, although still not perfectly reliable. The obvious response was simply to avoid the first row of the dialpad.
Upon first picking up the reciever, the listener hears a brief greeting, followed by a menu of single–digit choices in which 4 through 9 lead to further menus, while 3 and 0 are special items which play a selection immediately. (I am particularly proud of the 0 item, which picks a random short selection from a pool, so that one can dial it multiple times and get different results.) Each sub–menu provides the option to exit to the main menu, by dialing 0. Likewise, a listener who does not make a selection, after listening through the whole sub–menu, is automatically returned to the main menu after 10 seconds.
In sub–menus 4—8, which have 12 items each, the selections are numbered 44—49 and 54—59. When I succeed in acquiring the elusive third volume of Let’s Talk About the Atom, or the third volume of Energy & the Atom, I can expand these to 18 items each by adding 64–69, as necessary. Sub–menu 9 is currently all longer items, which are numbered 44, 54—57, 64—67, and 84+85, thus grouping the parts of each single recording together.
With these files, you should be able to exactly duplicate my project as described above. That is, however, unlikely to be of great interest. Hopefully they will help you in exploring a project of your own.
Mars!spot
Elements from the Starssegment)
Cosmic Rayssegment)
Acceleratorssegment)
Wanted : Let’s Talk About the Atom volume 3, not known to Discogs, but referred to in the cover letter included with Let’s Talk About Energy — Energy & the Atom volume 3 — further ANL science series, possibly from 1968, entitled This Age of Promise and The House of Science, referred to in the cover letter for Let’s Talk About the Atom volume 1 — Science Report records from the American Institute of Physics, except for the 17th—25th, 27th, and 30th Editions — and a series of NASA records called The Space Story, so I can do all of this again on another topic.
My first attempt at deploying the setup in public was at Pemmi–Con, the 15th occasional North American Science Fiction Convention, held in Winnipeg, Manitoba, in July of 2023. I learned the hard way that the Toshiba netbook would not boot without the battery installed. This I did not have with me, because I ended up traveling by air, with the computer, ATA, and telephones all in my check baggage, where such batteries are not permitted. The result was much frustration and wasted time when I should have been enjoying the convention.
After getting home, I bought a secondhand Raspberry Pi, in order to avoid having to deal with this problem in the future — and save a little weight and volume in my baggage.
I brought the Info–Phone to LosCon in late November of 2023. It did not seem to get much use, but it did receive an accolade from an accessibility volunteer, who was very pleased that someone had thought to provide an exhibit suitable for the visually–impaired.
Its next outing was at AnimeFest in late July of 2024. It attracted considerable attention, although few people seemed inclined to stay around long enough to listen to a full recording. Seating might have been helpful there.
On a visit to Vienna in September of 2024, I discovered an unexpected commercial
implementation of this idea in the Cathedral Church of Saint Stephen and All Saints.
There were two types of Phonomat
, both of which gave the impression of being from the 1960s or early
’70s, and of having been remodelled at some point.
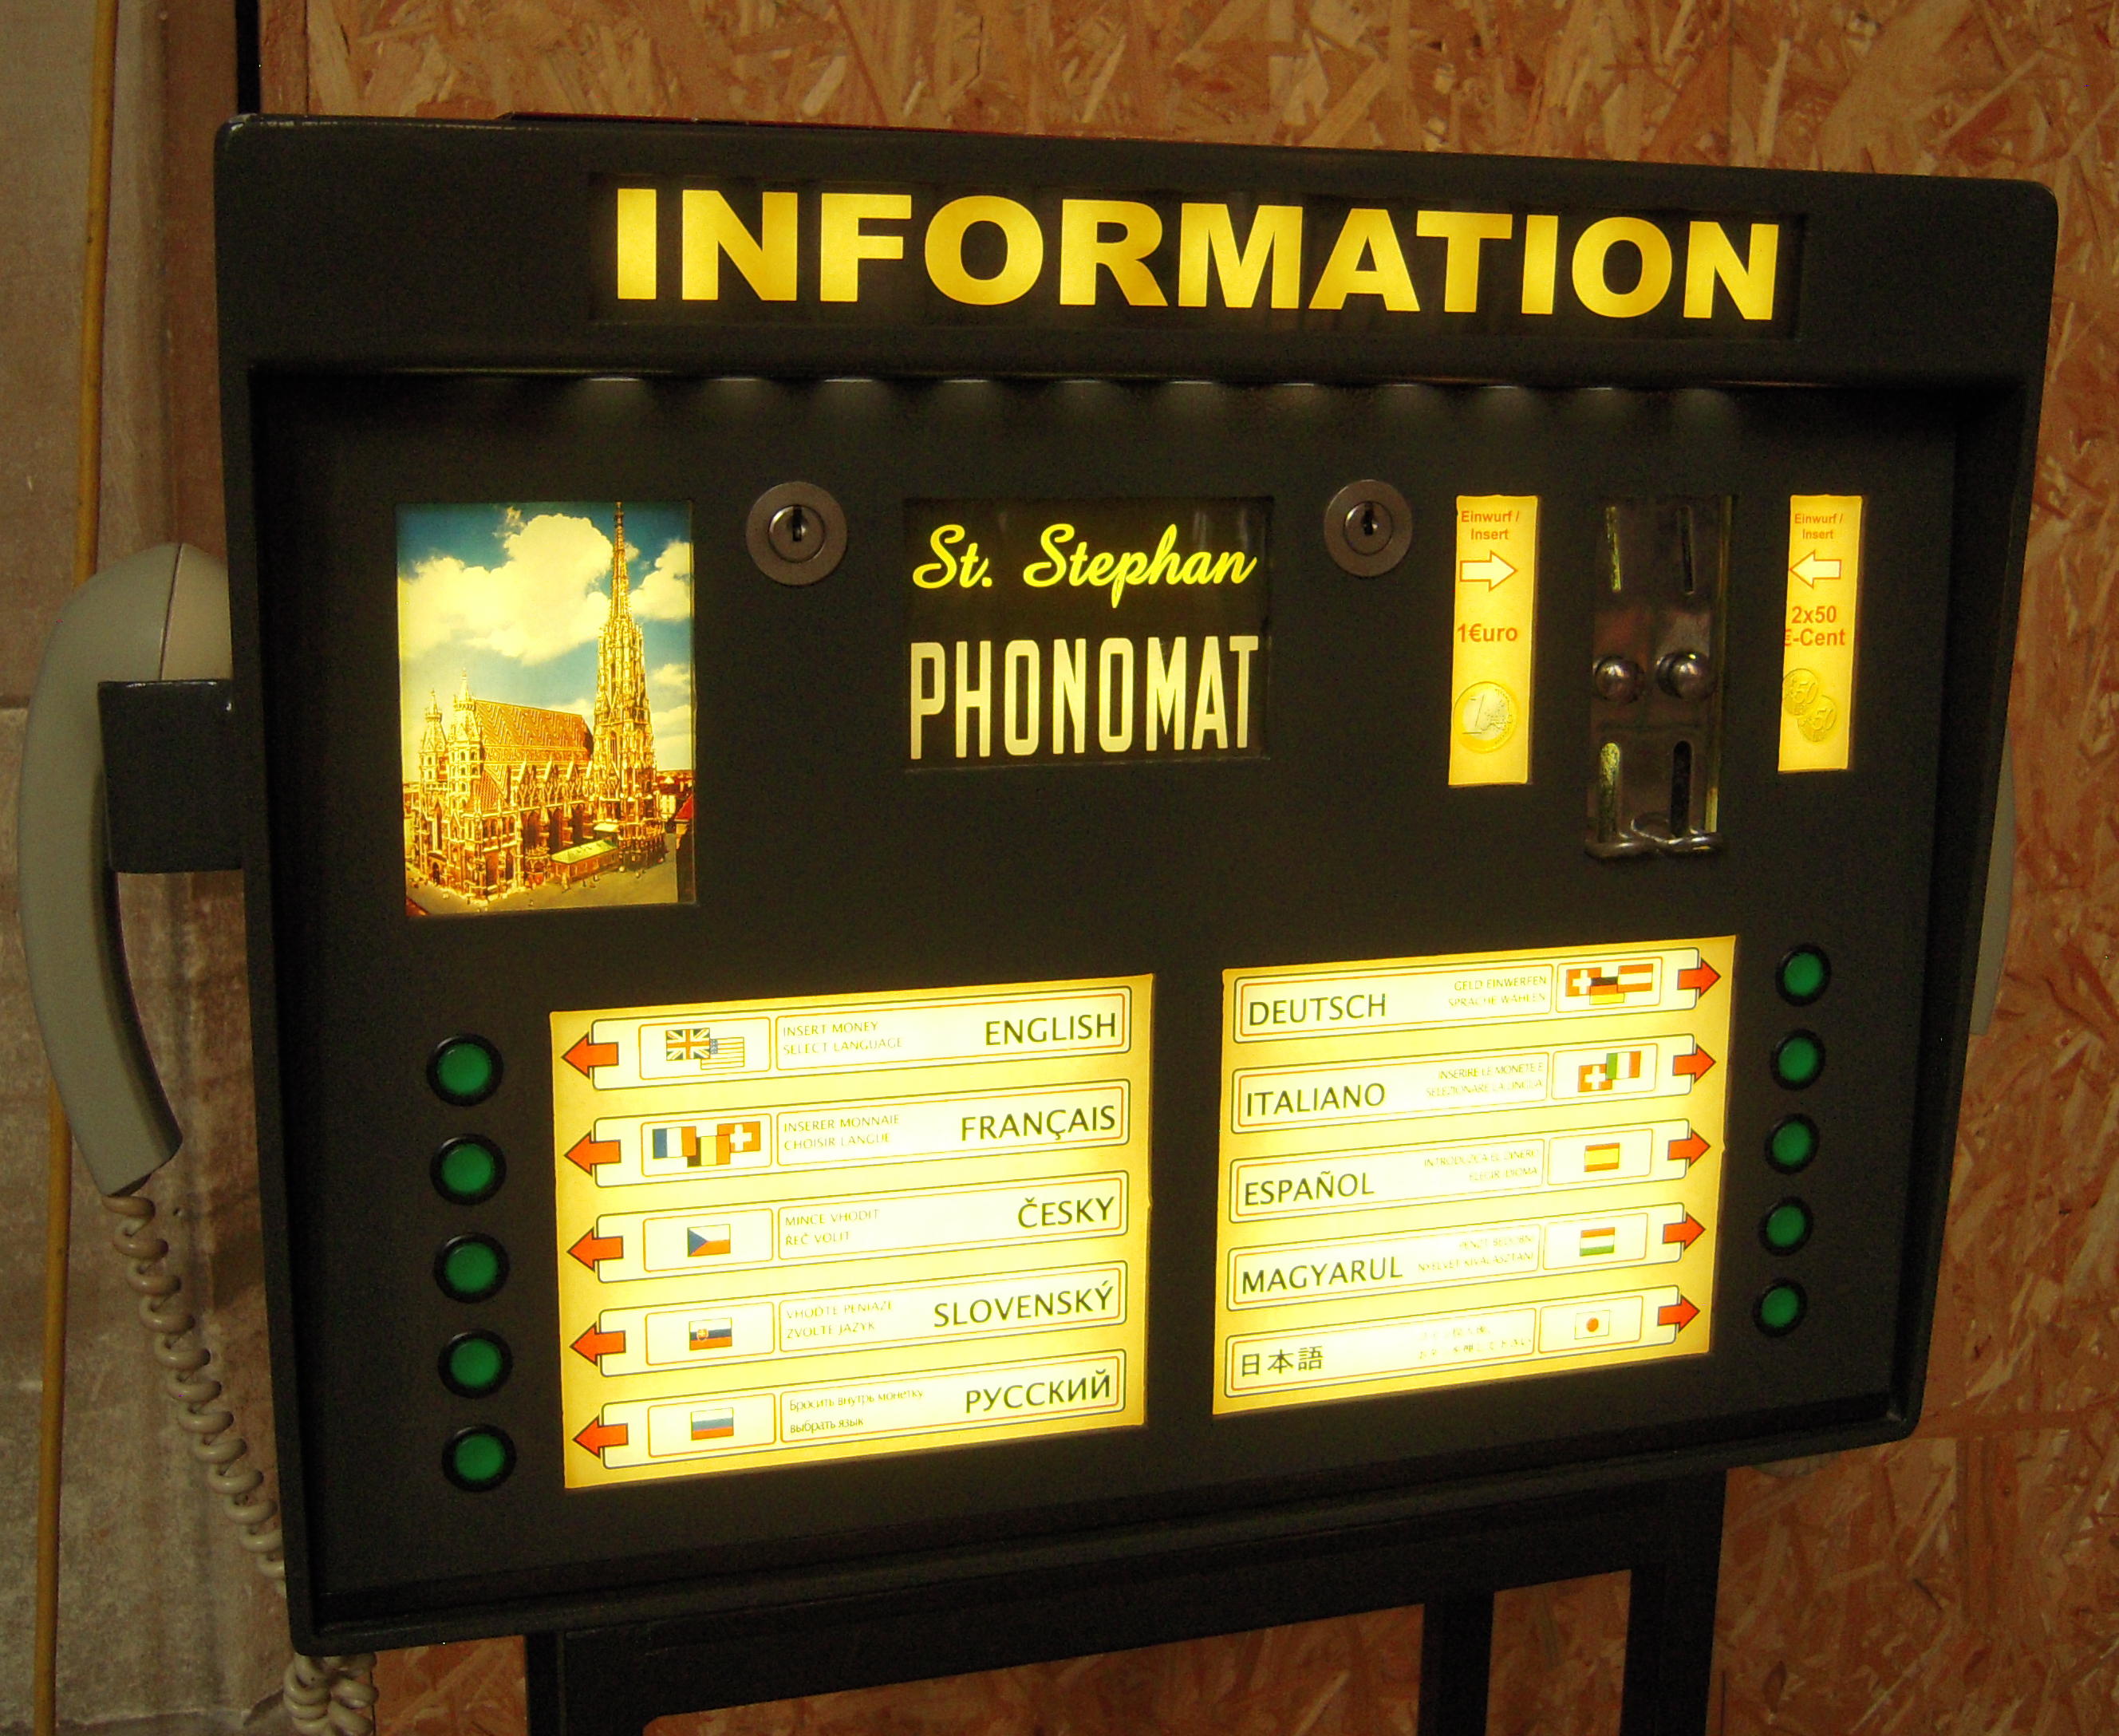
Phonomatinformation kiosk.

Phonomat.